Device Onboarding End-to-End Use Case#
This tutorial describes how to:
Onboard the Fast IDentity Online (FIDO) device (the Robot).
Register the Robot in ThingsBoard*.
Set up a secure TLS connection for communication.
Load specified applications (containers) to the EI for AMR device.
These machines are used:
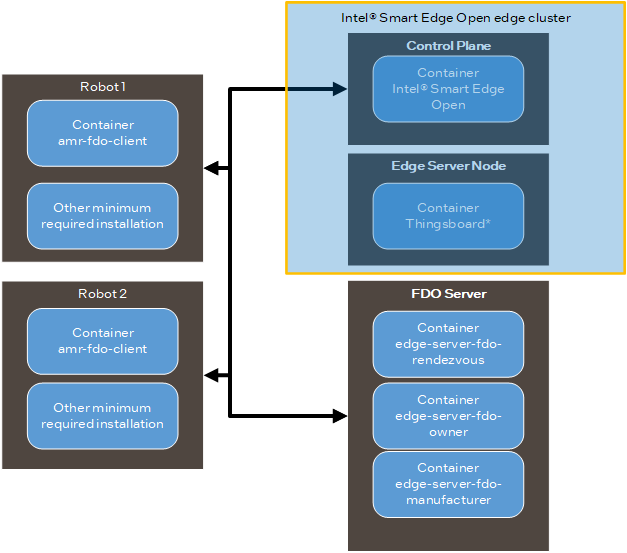
The Intel® Smart Edge Open control plane which deploys ThingsBoard* to the edge node (The ThingsBoard* GUI is accessed with the control plane IP and mapped port.)
Note
In a Single-Node deployment, ThingsBoard* is installed on the same machine as the control plane.
In a Multi-Node deployment, ThingsBoard* is installed on an edge node, not the control plane.
The EI for AMR Robot that you want to onboard
executes amr-fdo-client in terminal 1.
Note
The diagram only shows two robots but you can add as many as you need.
The FDO server which executes the manufacturer, rendezvous and owner servers
edge-server-fdo-manufacturer on terminal 1
edge-server-fdo-owner on terminal 2
edge-server-fdo-rendezvous on terminal 3
terminal 4 for configuration and control
Note
The FDO server can be on any machine in the same network as the control plane. In this tutorial, the FDO server is on an edge node.
The Onboarding Flow#
In this flow, the FIDO device, or FDO client, is the Robot.
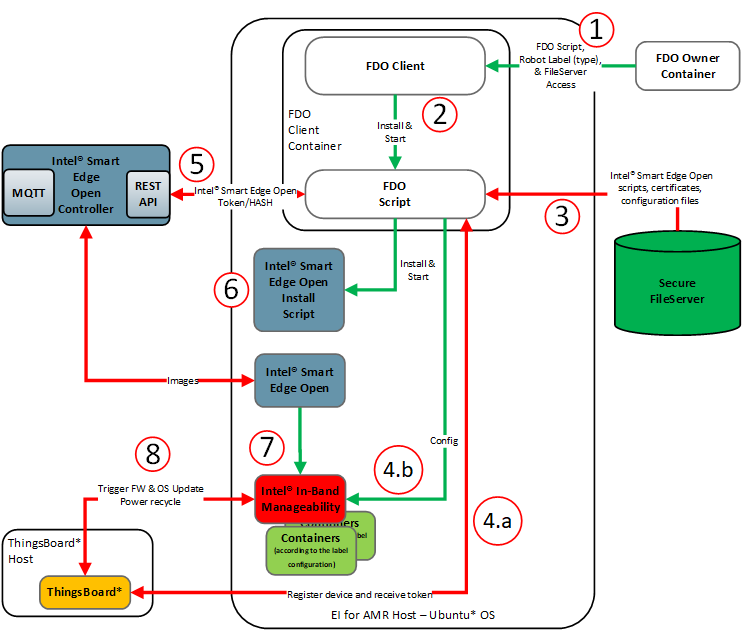
The FDO owner sends the FDO script,
fileserveraccess, andfilelistto the robot at field to be onboarded.The FDO client saves and starts the FDO script.
FDO loads and stores files from FileServer.
FDO registers the device in ThingsBoard* and and writes the Intel® In-Band Manageability configuration.
FDO provisions each new device.
Device naming convention:
<SEO 'tier' label value>_<SEO 'environment' label value>_<IP Address of Device>_<Hostname of Device>_<MAC Address of Device>
Example:
BasicFleetManagement_tutorial_127.0.0.1_noop_00005E0053EA
FDO saves the Intel® In-Band Manageability configuration and certification files in the host file system.
FDO registers the device in Intel® Smart Edge Open and gets the token and hash.
FDO starts the Intel® Smart Edge Open install script.
Intel® Smart Edge Open deploys all configured containers, including Intel® In-Band Manageability, and brings them up.
When ThingsBoard* receives a new device online event, ThingsBoard* triggers a firmware and OS update. After completion, the power recycles.
Prerequisites#
You must do all sections of this tutorial in order.
Configure the edge with the Get Started Guide for Robot Orchestration.
Verify that the robot has a product name.
dmidecode -t system | grep Product
If the robot does not have a product name, the onboarding flow fails because this information is required when configuring the OTA update. To assign a name, complete the following steps.
Prepare for the Intel® RealSense™ camera firmware update.
Download the latest firmware version from https://dev.intelrealsense.com/docs/firmware-releases.
Place the
.binfile that contains the firmware in a.tar.gzarchive. Make sure that you do not archive the entire directory, only the.binfile.Set up a basic HTTP server, and upload the
.tar.gzon it as a trusted repository server:Install the apache2:
sudo apt update
sudo apt install apache2
Put the
.binfile inside a.tar.gz, and place it on a http server:tar -czvf rs_firmware_update.tar.gz Signed_Image_UVC_<version>.bin sudo cp rs_firmware_update.tar.gz /var/www/html/
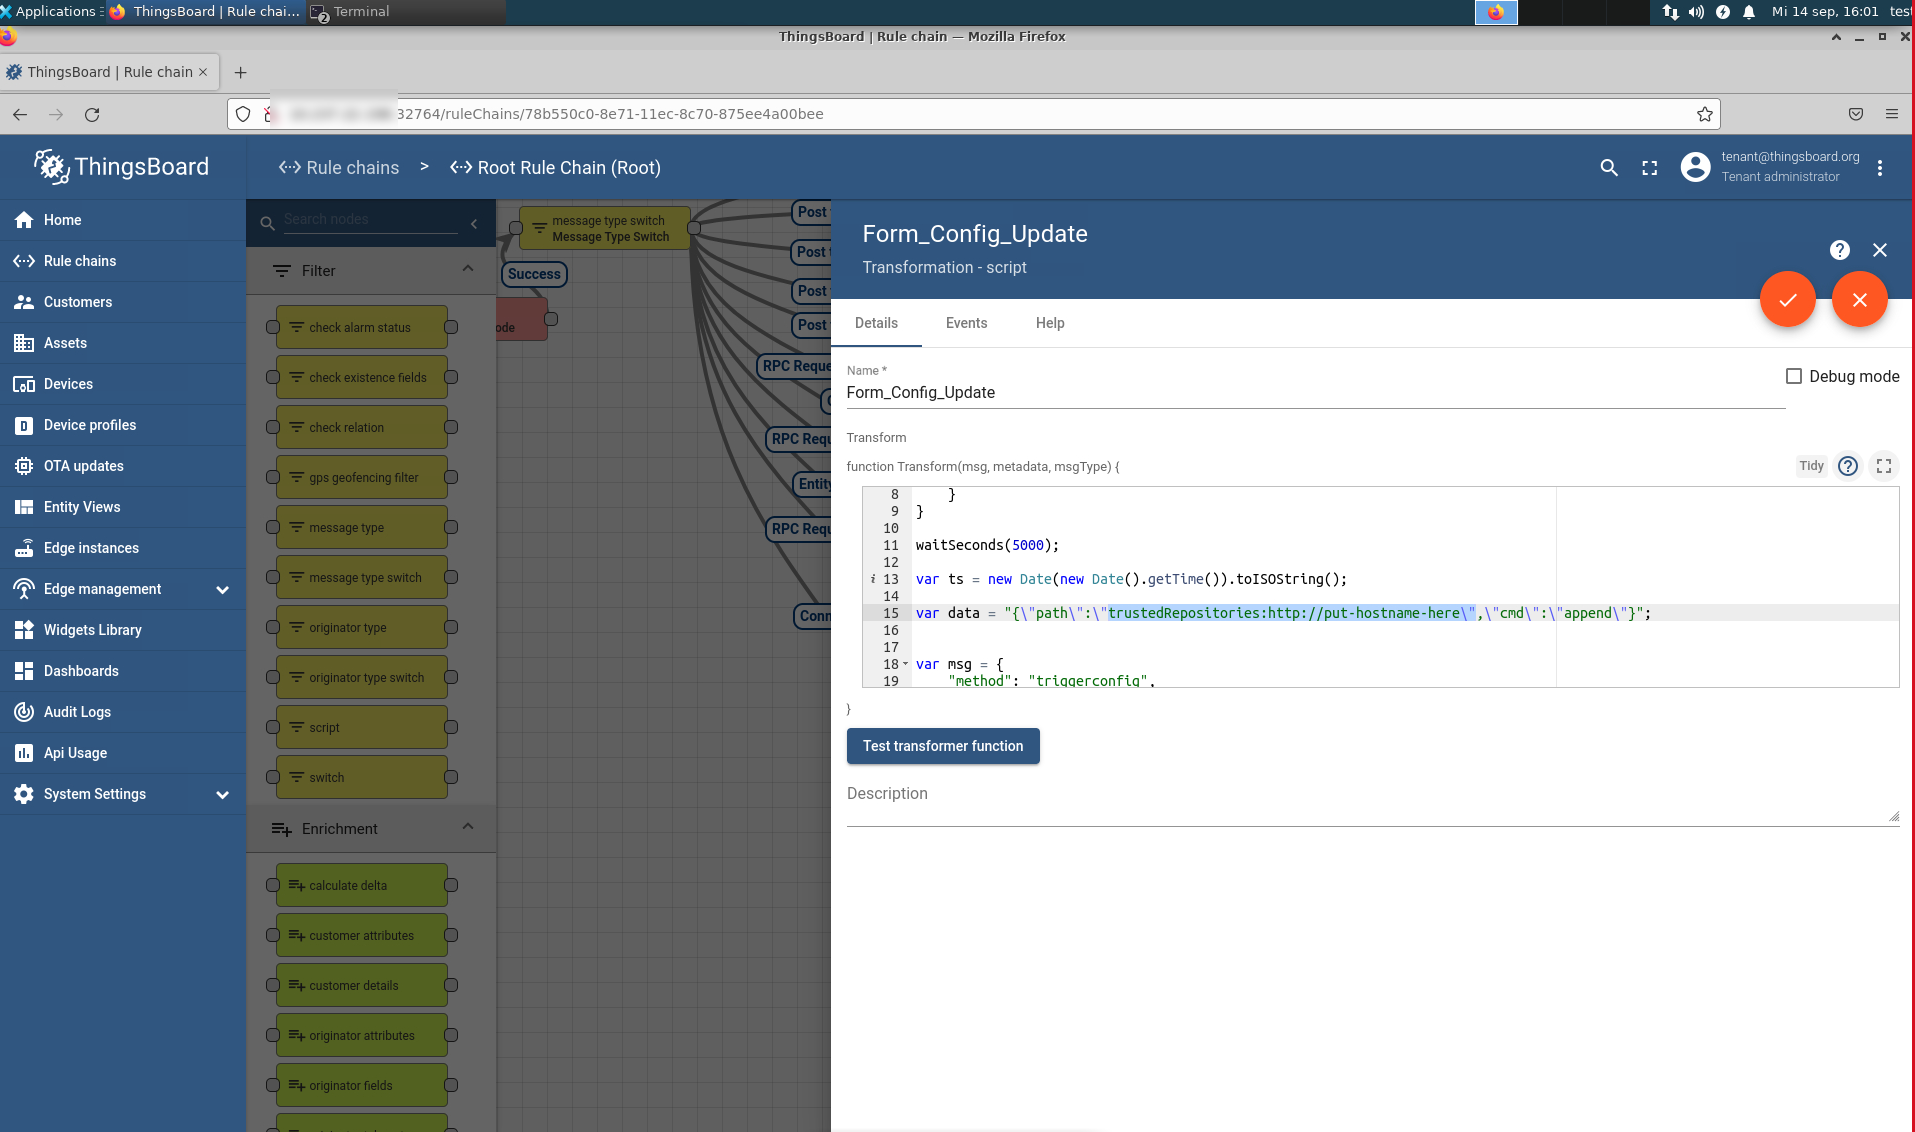
On ThingsBoard*, open Rule Chain.
Open Form_Config_Update, and, on line 15, update the URL of HTTP host that has the new firmware.
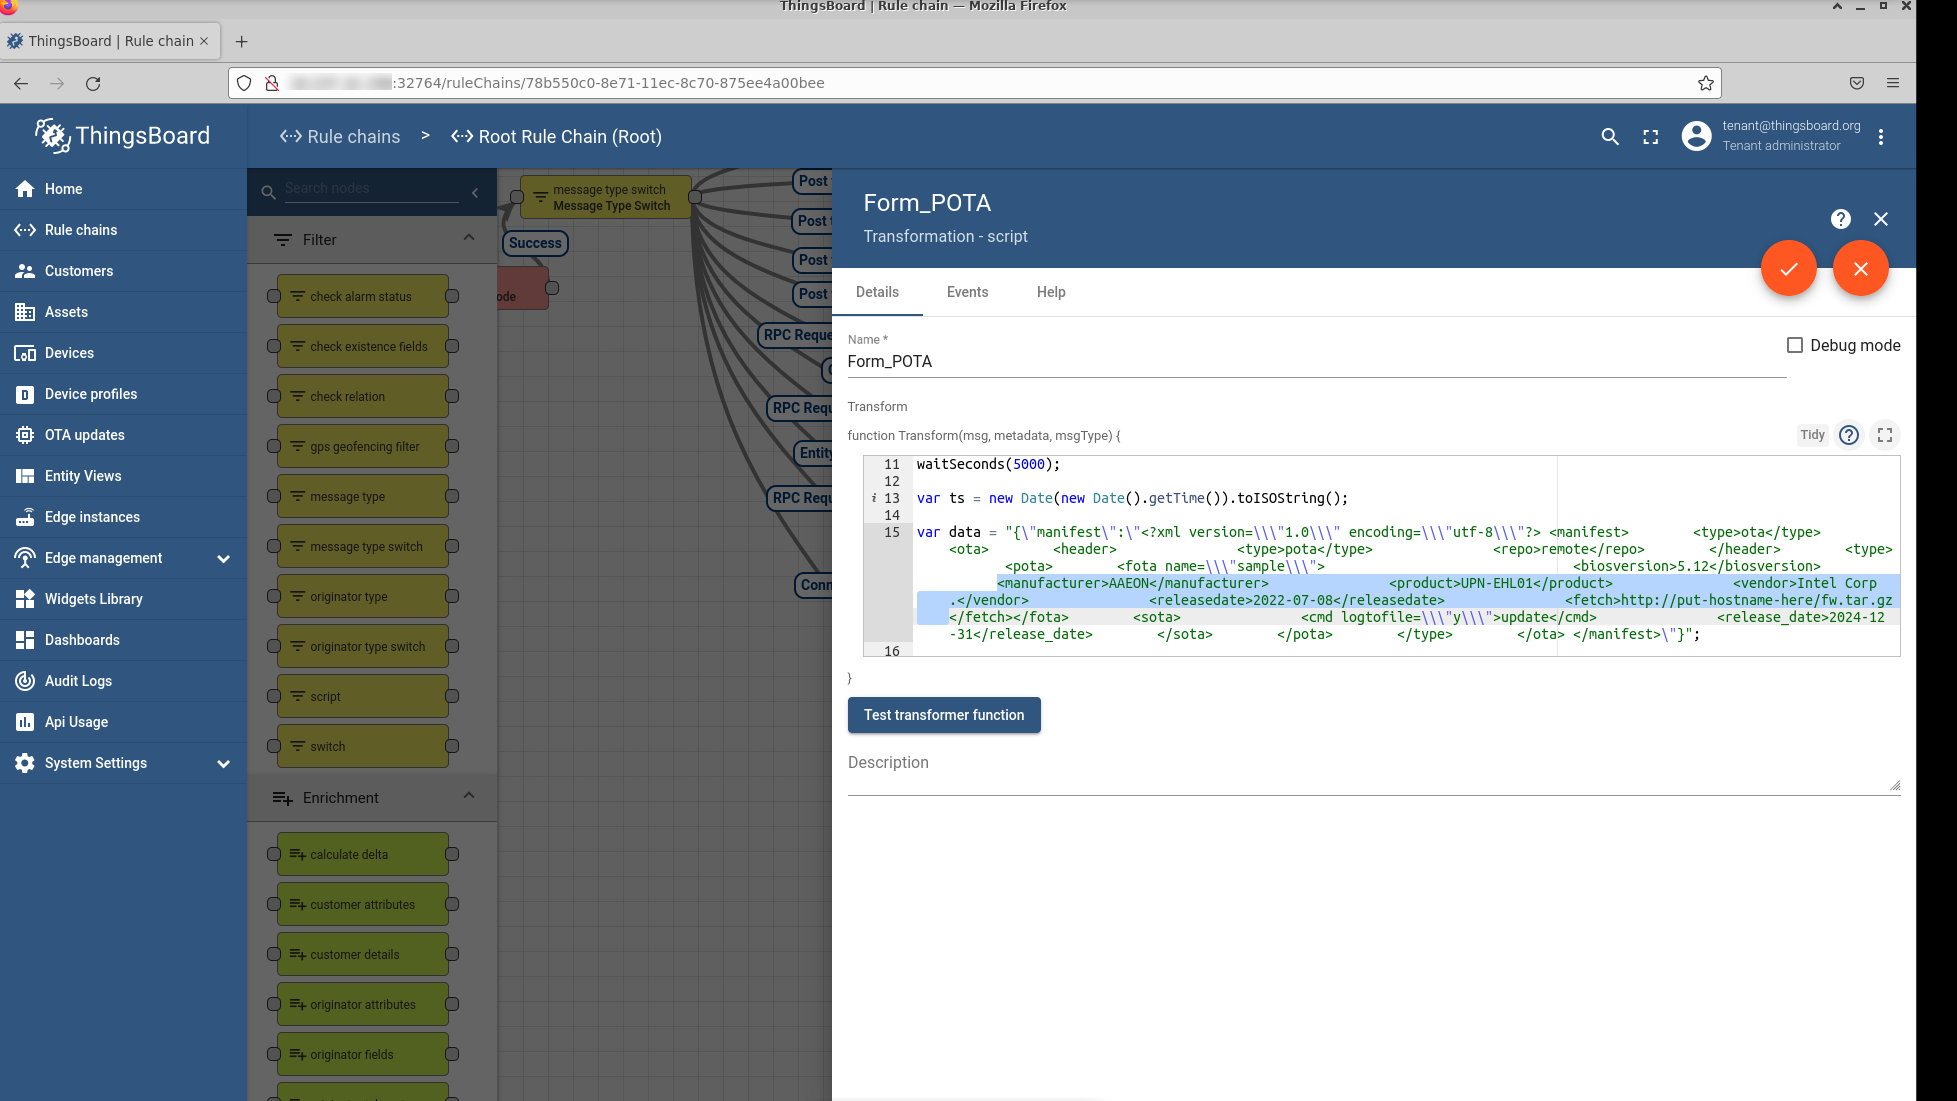
Open Form_POTA, and, on line 15, update the following.
The entire HTTP URL with the .tar.gz file for the firmware file.
Note
The link should be similar to
http://<hostname>/<archive.tar.gz>The Manufacturer, Vendor, and the Product name with the output of the following commands. Execute these commands on the robot.
dmidecode -t system  | grep Product
dmidecode -t system  | grep Manufacturer
dmidecode -t bios  | grep Vendor
Note
Updating the Manufacturer, Vendor, and Product name needs to be done every time you onboard a new type of robot. If these values do not match the ones from the robot trying to onboard, the flow fails.
Save all changes.
Configure the Robot and the FDO Server for the Onboarding Flow#
Robot and FDO server Download, and install the needed scripts from the latest release.
Note
These steps only install certain modules (Docker Community Edition CE) and the set of scripts needed for this onboarding tutorial. These steps do not install the full Robot Complete Kit bundle on your Robot.
Go to the Product Download page.
Select:
For Robot, Robot Complete Kit.
For FDO server, Server Complete Kit.
Click Download.
Copy the zip file to your target machine.
Extract and install the software:
unzip edge_insights_for_amr.zip
cd edge_insights_for_amr
chmod 775 edgesoftware
export no_proxy="127.0.0.1/32,devtools.intel.com"
./edgesoftware download
./edgesoftware list
Note
Get the IDs for the Docker* Community Edition CE:
./edgesoftware update <ID_Docker Community Edition CE>
sudo groupadd docker
sudo usermod -aG docker $USER
newgrp docker
source /etc/environment
Configure password-less
sshaccess forroot:Edit
/etc/ssh/sshd_config:sudo nano /etc/ssh/sshd_config
Add the following line at the end of the file:
PermitRootLogin yes
Restart the
sshservice:sudo service ssh restart sudo su service ssh restart ssh-keygen exit
FDO server All images in the FDO pipeline are self-contained and require minimal configuration. Configuration settings are all handled by external environment files, but some environment files need to be generated by running the
fdo_keys_gen.shscript:cd <edge_insights_for_amr_path>/Edge_Insights_for_Autonomous_Mobile_Robots_*/AMR_server_containers/01_docker_sdk_env/artifacts/02_edge_server/edge_server_fdo/ chmod +x fdo_keys_gen.sh bash fdo_keys_gen.sh .
Robot Install the Battery Bridge Kernel Module.
cd components/amr_battery_bridge_kernel_module/src/
chmod a+x module_install.sh
# below command will install battery-bridge-kernel-module
sudo module_install.sh
# to uninstall battery-bridge-kernel-module (if needed)
sudo module_install.sh -u
The Battery Bridge Kernel Module does not work on Secure Boot machines. To disable UEFI Secure Boot:
Go to the BIOS menu.
Open Boot > Secure Boot.
Disable Secure Boot.
Save the new configuration, and reboot the machine.
Note
When the robot uses an actual battery, the sensor-driver of the robot provides the corresponding driver’s ros-interface, which writes battery status into generic ros2-topic interface /sensors/battery_state. However, this information is usually not transmitted to the generic OS interface /sys/class/power_supply. Components that interact with the OS directly (for example, Intel® In-Band Manageability), cannot get battery-information from the OS. To bridge this gap, a ROS component battery-bridge and battery-bridge-kernel-module are provided. Using this battery-bridge, battery-status can be transmitted via a kernel module to the standard OS interface /sys/class/power_supply. The kobuki driver and kobuki_ros_interfaces is proven to work with battery-bridge and battery-bridge-kernel-module components.
Robot Set the robot type by adding your robot type to
/etc/robottype. The supported values areamr-aaeonandamr-pengo. Example:sudo echo "amr-aaeon" > /etc/robottype
Robot Disable swap:
sudo sed -ri '/\sswap\s/s/^#?/#/' /etc/fstab
swapoff -a
Prepare the Environment Needed to Build the FDO Docker* Images#
These steps have to be re-executed if a terminal is re-started.
Robot
export DISPLAY=0:0
cd <edge_insights_for_amr_path>/Edge_Insights_for_Autonomous_Mobile_Robots_*/
export no_proxy=<no_proxy>,ip_from_fdo_server,ip_from_robot,localhost
sudo su
source ./AMR_containers/01_docker_sdk_env/docker_compose/common/docker_compose.source
FDO server all terminals
export DISPLAY=0:0
cd <edge_insights_for_amr_path>/Edge_Insights_for_Autonomous_Mobile_Robots_*/
source ./AMR_server_containers/01_docker_sdk_env/docker_compose/common/docker_compose.source
Note
Set up the environment on every terminal on which you want to run
docker composecommands.FDO server terminal 1 Get the DNS:
sudo cat /run/systemd/resolve/resolv.conf
Robot Set the IP of the FDO server and the serial number of the robot.
Before building the FDO client image, there are a variety of configuration flags that need to be adjusted.
Important This step needs to be done for each robot you add to the cluster. You must use a unique serial number for each robot. These serial numbers are used later: when configuring the FDO server in Onboard's step 8.
Open
AMR_containers/01_docker_sdk_env/artifacts/01_amr/amr_fdo/device.config:cd <edge_insights_for_amr_path>/Edge_Insights_for_Autonomous_Mobile_Robots_*/AMR_containers nano 01_docker_sdk_env/artifacts/01_amr/amr_fdo/device.config
Add the following lines:
MANUFACTURER_IP_ADDRESS = ip_from_FDO_Server
For onboarding multiple robots, use a unique serial number for the
DEVICE_SERIAL_NUMBERvariable.This value must be unique for each robot that you onboard. Therefore, the default serial number, 1234abcd, can only be used once.
DEVICE_SERIAL_NUMBER = <unique_serial_number>
Build FDO Docker* Images#
Robot Build the fdo-client image:
cd <edge_insights_for_amr_path>/Edge_Insights_for_Autonomous_Mobile_Robots_*/AMR_containers
docker compose -f ./01_docker_sdk_env/docker_compose/01_amr/amr-sdk.all.yml build fdo-client
FDO server terminal 1 Build the FDO manufacturer server image:
Before building the FDO manufacturer image, there are a variety of configuration flags that need to be adjusted.
Open
01_docker_sdk_env/artifacts/02_edge_server/edge_server_fdo/manufacturer/service.yml:cd <edge_insights_for_amr_path>/Edge_Insights_for_Autonomous_Mobile_Robots_*/AMR_server_containers nano 01_docker_sdk_env/artifacts/02_edge_server/edge_server_fdo/manufacturer/service.yml
Add the following lines:
# Modify the values shown below in bold in the above file with respective DNS and IP address of Rendezvous server
rv-instruction:
   dns: dns_from_step_4
   ip: ip_from_FDO_Server
Build the manufacturer server image:
docker compose -f ./01_docker_sdk_env/docker_compose/02_edge_server/edge-server.all.yml build fdo-manufacturer
FDO server terminal 2 Build the owner server image:
cd <edge_insights_for_amr_path>/Edge_Insights_for_Autonomous_Mobile_Robots_*/AMR_server_containers
docker compose -f ./01_docker_sdk_env/docker_compose/02_edge_server/edge-server.all.yml build fdo-owner
FDO server terminal 3 Build the rendezvous server image:
cd <edge_insights_for_amr_path>/Edge_Insights_for_Autonomous_Mobile_Robots_*/AMR_server_containers
docker compose -f ./01_docker_sdk_env/docker_compose/02_edge_server/edge-server.all.yml build fdo-rendezvous
See Troubleshooting if docker compose errors are encountered.
Initialize FDO#
FDO server - terminal 4 Adjust the Python script for your setup.
cd <edge_insights_for_amr_path>/Edge_Insights_for_Autonomous_Mobile_Robots_*/AMR_server_containers/
nano 01_docker_sdk_env/artifacts/02_edge_server/edge_server_fdo/scripts/sdo_script.py
For
DEF_TB_MQTT_PORT, replace1883with18883.For
network:Replace
0.0.0.0with your proxy IP.If you use a hostname for a proxy, get the proxy IP:
telnet proxy_hostname proxy_port
Leave it as
0.0.0.0if no proxy is required.
file_serverFor
host, replacexx.xxx.xx.xwith SFTP hostname or IP.For
user, replacesomeonewith the SFTP username.For
password, replacepasswith the SFTP password.For
fingerprint, replace :|1|pYOofp22FlwwWNHH+vaK8gWhSxw=|S713N4hkiSRJCzfJQgqMfaYTJWw= ecdsa-sha2-nistp256 AABBE2VjZHNhLXNoYTItbmlzdHAyNTYAAAAIbmlzdHAyNTYAAABBBFv3xFkoWZuALLa/iH8fLBK5ciKkvep+61DAGEBSiORQbPxUtvBo0qbi14/N+KD58YEkWrrzlQIEsp/minlSVKE=
With the output of the following command:
ssh-keyscan -t ecdsa [host | addrlist namelist]
thingsboardFor
host, replacexx.xxx.xx.xwith the control plane IP.For
http_port, replace9090with32764.For
sec_mqtt_port, replace8883with32767.For
device_key, replace9oq7uxtdsgt4yjyqdekgwith9oq7uxtdsgt4yjyqdekg.The value for
device_secretstays6z3j3osphpr8ck1b9ocp.
The values for
device_keyanddevice_secretare obtained from the ThingsBoard* web interface. Go to Thingsboard > Device Profiles > Device Profiles details > Device Provisioning.In preconfigured data, the following are set in ThingsBoard*:
device_key = "9oq7uxtdsgt4yjyqdekg"
device_secret = "6z3j3osphpr8ck1b9ocp"
seoFor
host, replacexx.xxx.xx.xxxwith the control plane IP.For
crt_hash, replacefd6d98ee914f5e08df1858b2e82e1ebacbcf35cae0ddd7e146ec18fa200a265bwith the output of the following commands on control plane:cd /etc/kubernetes/pki/ openssl x509 -pubkey -in ca.crt | openssl rsa -pubin -outform der 2>/dev/null | openssl dgst -sha256 -hex | sed 's/^.* //'
sftp_filelistIn the
fdo_sftp/etc/docker/certs.dline, replace10.237.22.133with the IP of the control plane.Add
/at the beginning of every line after"file":".
After you made the changes it should look similar to this:
sftp_filelist = '[ {"file":"/fdo_sftp/thingsboard.pub.pem","path":"/etc/tc" },\
                  {"file":"/fdo_sftp/pki/ca.crt","path":"/host/etc/kubernetes/pki" },\
                  {"file":"/fdo_sftp/pki/apiserver-kubelet-client.crt","path":"/host/etc/kubernetes/pki" },\
                  {"file":"/fdo_sftp/pki/apiserver-kubelet-client.key","path":"/host/etc/kubernetes/pki" },\
                  {"file":"/fdo_sftp/root/.docker/config.json","path":"/host/root/.docker/" },\
                  {"file":"/fdo_sftp/etc/docker/daemon.json","path":"/host/etc/docker/" }, \
                  {"file":"/fdo_sftp/etc/docker/certs.d/<Replace here with Control Plane IP>:30003/ca.crt","path":"/host/etc/docker/certs.d/<Replace here with Control Plane IP>:30003" },\
                  {"file":"/fdo_sftp/etc/systemd/system/docker.service.d/http-proxy.conf","path":"/host/etc/systemd/system/docker.service.d" },\
                  {"file":"/fdo_sftp/seo_install.sh","path":"/host/root" },\
                  {"file":"/fdo_sftp/k8s_apply_label.py","path":"/host/root" },\
                  {"file":"/fdo_sftp/etc/amr/ri-certs/server.pem","path":"/host/etc/amr/ri-certs" },\
                  {"file":"/fdo_sftp/etc/amr/ri-certs/client.key","path":"/host/etc/amr/ri-certs" },\
                  {"file":"/fdo_sftp/etc/amr/ri-certs/client.pem","path":"/host/etc/amr/ri-certs" }]'
FDO server terminal 4 Edit
01_docker_sdk_env/artifacts/02_edge_server/edge_server_fdo/scripts/multi_machine_config.sh:nano 01_docker_sdk_env/artifacts/02_edge_server/edge_server_fdo/scripts/multi_machine_config.sh
Assign the value from
01_docker_sdk_env/artifacts/02_edge_server/edge_server_fdo/creds/manufacturer/service.envto the variablemfg_api_passwd.cat 01_docker_sdk_env/artifacts/02_edge_server/edge_server_fdo/creds/manufacturer/service.env
Assign the value from
01_docker_sdk_env/artifacts/02_edge_server/edge_server_fdo/creds/owner/service.envto the variabledefault_onr_api_passwd.cat 01_docker_sdk_env/artifacts/02_edge_server/edge_server_fdo/creds/owner/service.env
Replace
{rv-dns}with the FDO server DNS.Replace
{owner-dns}with the FDO server DNS.Replace
{rv-ip}with the FDO server IP.Replace
{owner-ip}with the FDO server IP.Replace the
http://localhost:8042andhttp://localhost:8039in both curl commands withhttp://FDO_SERVER_IP:8042withhttp://FDO_SERVER_IP:8039.
Example (without the curly brackets):
mfg_api_passwd={manufacturer_api_password_from_service.env}
onr_api_passwd={owner_api_password_from_service.env}
.......................................................
# Updating RVInfo blob in Manufacturer
# Replace localhost, {rv-dns} and {rv-ip} references with respective DNS and IP address of the host machine
curl -D - --digest -u "${api_user}":"${mfg_api_passwd}" --location --request POST 'http://<ip_from_FDO_SERVER>:8039/api/v1/rvinfo' \
--header 'Content-Type: text/plain' \
--data-raw '[[[5,"dns"],[3,8040],[12,1],[2,"ip_from_FDO_SERVER"],[4,8040]]]'

# Updating T02RVBlob in Owner
# Replace localhost, {owner-ip} and {owner-dns} references with respective DNS and IP address of the host machine
curl -D - --digest -u "${api_user}":"${onr_api_passwd}" --location --request POST 'http://<ip_from_FDO_SERVER>:8042/api/v1/owner/redirect' \
--header 'Content-Type: text/plain' \
--data-raw '[["ip_from_FDO_SERVER","dns",8042,3]]'
FDO server terminal 3 Edit
01_docker_sdk_env/artifacts/02_edge_server/edge_server_fdo/scripts/extend_upload.sh, and set the following variables:nano 01_docker_sdk_env/artifacts/02_edge_server/edge_server_fdo/scripts/extend_upload.sh
Assign the value from
01_docker_sdk_env/artifacts/02_edge_server/edge_server_fdo/creds/manufacturer/service.envto the variabledefault_mfg_api_passwd.cat 01_docker_sdk_env/artifacts/02_edge_server/edge_server_fdo/creds/manufacturer/service.env
Assign the value from
01_docker_sdk_env/artifacts/02_edge_server/edge_server_fdo/creds/owner/service.envto the variableowner_api_password_from_machine.cat 01_docker_sdk_env/artifacts/02_edge_server/edge_server_fdo/creds/owner/service.env
Assign the FDO server IP to the variable
default_mfg_ip.Assign the FDO server IP to the variable
default_onr_ip.
Example:
default_mfg_ip="<ip_from_FDO_SERVER>"
default_onr_ip="<ip_from_FDO_SERVER>"
...........................
default_mfg_api_passwd="<manufacturer_api_password_from_service.env>"
default_onr_api_passwd="<owner_api_password_from_service.env>"
FDO server terminal 3 Edit
01_docker_sdk_env/artifacts/02_edge_server/edge_server_fdo/scripts/configure_serviceinfo.sh, and set the following variables:nano 01_docker_sdk_env/artifacts/02_edge_server/edge_server_fdo/scripts/configure_serviceinfo.sh
Assign the FDO server IP to the variable
OWNER_IP.
Onboard#
FDO is a new IoT standard that is built on Intel® Secure Device Onboard (Intel® SDO) specifications. It is the first step in onboarding a device. The FDO specification specifies four entities.
Device: the EI for AMR device plus the FDO client (the FDO client supports the FDO protocol)
Manufacturer Server: the entity that is responsible for the initial steps of the FDO protocol and loading credentials onto the device, and is also a part of the production flow of the EI for AMR device
Owner Server: the entity that sends all required data (for example, keys and certificates) to the device in the final protocol step TO2
Rendezvous Server: the first contact point for the device after you switch the device on and configure it for network communication. The rendezvous server sends the device additional information, for example, how to contact the owner server entity.
All containers, including the client, follow this command structure:
docker compose -f <.yml path used during build stage> up <fdo service name>
FDO server terminal 1 Run the manufacturer server:
cd <edge_insights_for_amr_path>/Edge_Insights_for_Autonomous_Mobile_Robots_*/AMR_server_containers/
docker compose -f 01_docker_sdk_env/docker_compose/02_edge_server/edge-server.all.yml up fdo-manufacturer
FDO server terminal 2 Run the owner server:
cd <edge_insights_for_amr_path>/Edge_Insights_for_Autonomous_Mobile_Robots_*/AMR_server_containers/
docker compose -f 01_docker_sdk_env/docker_compose/02_edge_server/edge-server.all.yml up fdo-owner
FDO server terminal 3 In a new terminal window, run the rendezvous server:
cd <edge_insights_for_amr_path>/Edge_Insights_for_Autonomous_Mobile_Robots_*/AMR_server_containers/
docker compose -f 01_docker_sdk_env/docker_compose/02_edge_server/edge-server.all.yml up fdo-rendezvous
FDO server terminal 4 Add rules for the following ports:
ufw allow 8039
ufw allow 8040
ufw allow 8042
Robot Run the client:
cd <edge_insights_for_amr_path>/Edge_Insights_for_Autonomous_Mobile_Robots_*/AMR_server_containers/
sudo su
export no_proxy=<no_proxy>,ip_from_FDO_SERVER,ip_from_ROBOT,localhost
source ./01_docker_sdk_env/docker_compose/common/docker_compose.source
export CONTAINER_BASE_PATH=`pwd`
export ROS_DOMAIN_ID=17
CHOOSE_USER=root docker compose -f 01_docker_sdk_env/docker_compose/05_tutorials/fdo_client_onboard.yml up
After running the FDO client for the first time, the device initialization is complete:
FDO Client log snippet:

amr-sdk-fdo-client     | 09:56:55:433 FDOProtDI: Received message type 13 : 1 bytes
amr-sdk-fdo-client     | 09:56:55:433 Writing to Normal.blob blob
amr-sdk-fdo-client     | 09:56:55:433 Hash write completed
amr-sdk-fdo-client     | 09:56:55:434 HMAC computed successfully!
amr-sdk-fdo-client     | 09:56:55:434 Writing to Secure.blob blob
amr-sdk-fdo-client     | 09:56:55:434 Generating platform IV of length: 12
amr-sdk-fdo-client     | 09:56:55:434 Generating platform AES Key of length: 16
amr-sdk-fdo-client     | 09:56:55:434 Device credentials successfully written!!
amr-sdk-fdo-client     | (Current) GUID after DI: <GUID>
amr-sdk-fdo-client     | 09:56:55:434 DIDone completed
amr-sdk-fdo-client     | 09:56:55:434
amr-sdk-fdo-client     | ------------------------------------ DI Successful --------------------------------------
amr-sdk-fdo-client     | @@@@@@@@@@@@@@@@@@@@@@@@@@@@@@@@@@@@@
amr-sdk-fdo-client     | @FIDO Device Initialization Complete@
amr-sdk-fdo-client     | @@@@@@@@@@@@@@@@@@@@@@@@@@@@@@@@@@@@@
amr-sdk-fdo-client exited with code 0
Note
When starting FDO containers, start the FDO client image last because the FDO client image immediately begins reaching out to the manufacturer server in order to complete device initialization (DI), and it only attempt this connection a few times before exiting. If the FDO client is successful in connecting to the manufacturer server, the manufacturer server assigns a GUID to the FDO client and generates an ownership voucher for use in the rest of the pipeline.
FDO server terminal 4 Run multi_machine_config.sh:
Note
Run the FDO scripts on FDO server as
root.cd 01_docker_sdk_env/artifacts/02_edge_server/edge_server_fdo/scripts/ chmod +x * sudo su export no_proxy=<no_proxy>,ip_from_FDO_SERVER,ip_from_Robot,localhost ./multi_machine_config.sh
Expected output:
HTTP/1.1 401
WWW-Authenticate: Digest realm="Authentication required", qop="auth", nonce="1652260953609:a1f80c513623b4c7b87292c054d5d650", opaque="4F6AB1DF45A94C67D59892BC7DB6B6B4"
Content-Type: text/html;charset=utf-8
Content-Language: en
Content-Length: 673
Date: Wed, 11 May 2022 09:22:33 GMT

HTTP/1.1 200
Content-Length: 0
Date: Wed, 11 May 2022 09:22:33 GMT

HTTP/1.1 401
WWW-Authenticate: Digest realm="Authentication required", qop="auth", nonce="1652260953705:0e2856e16da3eb830dca777a34f1f154", opaque="E11DE6169652A5495FC93933790D1A04"
Content-Type: text/html;charset=utf-8
Content-Language: en
Content-Length: 673
Date: Wed, 11 May 2022 09:22:33 GMT

HTTP/1.1 200
Content-Length: 0
Date: Wed, 11 May 2022 09:22:33 GMT
FDO server terminal 4 Run the configure_serviceinfo.sh:
./configure_serviceinfo.sh
Expected output:
Upload Device execution script to Owner Server
HTTP/1.1 401
WWW-Authenticate: Digest realm="Authentication required", qop="auth", nonce="1652941145981:e5cdb0c180cd069360cd159fdcadccde", opaque="BE4E73265635CC0D98F9430BABA64DBE"
Content-Type: text/html;charset=utf-8
Content-Language: en
Content-Length: 673
Date: Thu, 19 May 2022 06:19:05 GMT

HTTP/1.1 100

HTTP/1.1 200
Content-Length: 0
Date: Thu, 19 May 2022 06:19:05 GMT
FDO server terminal 4 Add the robot by using the serial number.
./extend_upload.sh -s <serial_number>
# By default the serial number is 1234abcd, the exepcted output is assuming this serial number.
./extend_upload.sh -s 1234abcd  # use your robot's serial number.
Note
The serial number is the value of
DEVICE_SERIAL_NUMBERfrom the 01_docker_sdk_env/artifacts/01_amr/amr_fdo/device.config file, set on the robot when preparing to build the FDO server in Prepare the Environment Needed to Build the FDO Docker* Images.Expected output:
Success in downloading SECP256R1 owner certificate to owner_cert_SECP256R1.txt
Success in downloading extended voucher for device with serial number 1234abcd
Success in uploading voucher to owner for device with serial number 1234abcd
GUID of the device is 7e1e0c59-6d87-4b40-b68d-e7fcc00a7e37
Success in triggering TO0 for 1234abcd with GUID 7e1e0c59-6d87-4b40-b68d-e7fcc00a7e37 with response code: 200
xxxx@FDO_SERVER: 01_docker_sdk_env/artifacts/02_edge_server/edge_server_fdo/scripts$
FDO server terminal 2 In the
edge-server-fdo-ownerlogs, verify that TO0 finished.edge-server-fdo-owner | 06:49:50.463 [INFO ] TO0 completed for GUID: ...
Note
This task can take more than three minutes.
Robot
CHOOSE_USER=root docker compose -f 01_docker_sdk_env/docker_compose/05_tutorials/fdo_client_onboard.yml up
Robot In the client messages, verify that FDO completed.
amr-fdo-client         | ------------------------------------ TO2 Successful --------------------------------------
amr-fdo-client         |
amr-fdo-client         | @@@@@@@@@@@@@@@@@@@@@@@@@@@@@@
amr-fdo-client         | @FIDO Device Onboard Complete@
amr-fdo-client         | @@@@@@@@@@@@@@@@@@@@@@@@@@@@@@
amr-fdo-client exited with code 0
Note
FDO protocol steps TO1 and TO2 can take more than five minutes.
Expected result:
Control plane In the ThingsBoard* GUI, Robot was added in Devices as a new device.
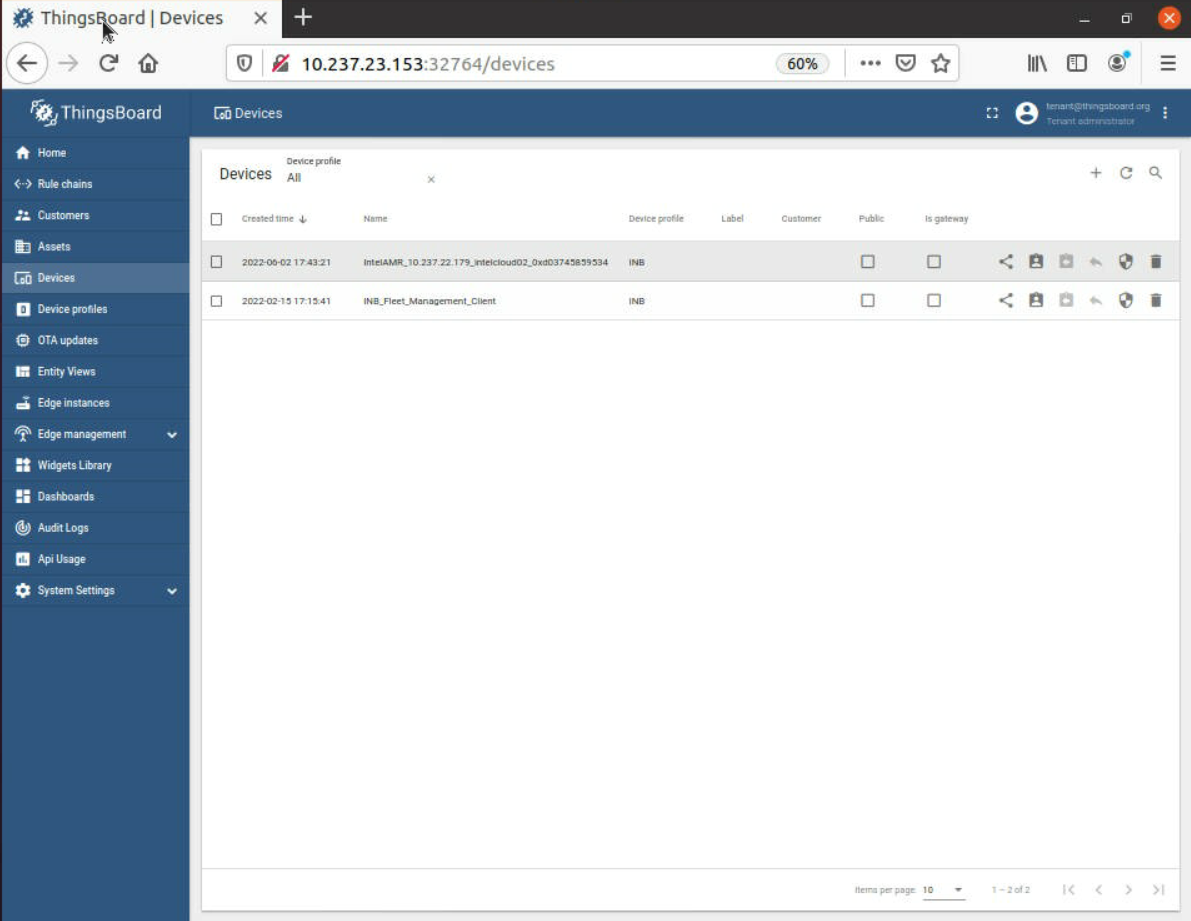
Note
The device is online on the Dashboard after the Intel® In-Band Manageability container in Robot is automatically brought up successfully.
Robot The Wandering application is deployed from the Intel® Smart Edge Open controller, and the robot starts to wander around.
Verify that the onboarding was successful by checking the followings logs on the control plane:
$ kubectl get all --output=wide --namespace onboarding
NAME                                        READY   STATUS             RESTARTS         AGE   IP              NODE              NOMINATED NODE   READINESS GATES
pod/onboarding-deployment-95f5dc897-44xpj   0/16    Pending            0                61m   <none>          <none>            <none>           <none>
pod/onboarding-deployment-95f5dc897-8267z   0/16    Pending            0                61m   <none>          <none>            <none>           <none>
pod/onboarding-deployment-95f5dc897-99svk   0/16    Pending            0                61m   <none>          <none>            <none>           <none>
pod/onboarding-deployment-95f5dc897-j6t5j   0/16    Pending            0                61m   <none>          <none>            <none>           <none>
pod/onboarding-deployment-95f5dc897-qd22f   16/16   Running           38 (4m15s ago)   61m   10.245.224.68   glaic3ehlaaeon2   <none>           <none>

NAME                         TYPE       CLUSTER-IP      EXTERNAL-IP   PORT(S)          AGE   SELECTOR
service/onboarding-service   NodePort   10.105.68.202   <none>        8883:32759/TCP   61m   app.kubernetes.io/instance=onboarding-abcxzy,app.kubernetes.io/name=onboarding

NAME                                    READY   UP-TO-DATE   AVAILABLE   AGE   CONTAINERS                                                                                                                                                                                                                                                                                     IMAGES                                                                                                                                                                                                                                                                                                                                                                                                                                                                                                                                                                                                                                                                                                                                                                                                                                                                         SELECTOR
deployment.apps/onboarding-deployment   0/5     5            0           61m   dds-bridge,amr-fleet-management,vda5050-ros2-bridge,amr-realsense,amr-ros-base-camera-tf,amr-aaeon-amr-interface,amr-ros-base-teleop,amr-battery-bridge,amr-object-detection,imu-madgwick-filter,robot-localization,amr-collab-slam,amr-fastmapping,amr-nav2,amr-wandering,amr-vda-navigator   10.237.22.198:30003/intel/eclipse/zenoh-bridge-dds:0.5.0-beta.9,10.237.22.198:30003/intel/amr-fleet-management:2023.1,10.237.22.198:30003/intel/amr-vda5050-ros2-bridge:2023.1,10.237.22.198:30003/intel/amr-realsense:2023.1,10.237.22.198:30003/intel/amr-ros-base-camera-tf:2023.1,10.237.22.198:30003/intel/amr-aaeon-amr-interface:2023.1,10.237.22.198:30003/intel/amr-ros-base-teleop:2023.1,10.237.22.198:30003/intel/amr-battery-bridge:2023.1,10.237.22.198:30003/intel/amr-object-detection:2023.1,10.237.22.198:30003/intel/amr-imu-madgwick-filter:2023.1,10.237.22.198:30003/intel/amr-robot-localization:2023.1,10.237.22.198:30003/intel/amr-collab-slam:2023.1,10.237.22.198:30003/intel/amr-fastmapping:2023.1,10.237.22.198:30003/intel/amr-nav2:2023.1,10.237.22.198:30003/intel/amr-wandering:2023.1,10.237.22.198:30003/intel/amr-vda-navigator:2023.1   app.kubernetes.io/instance=onboarding-abcxzy,app.kubernetes.io/name=onboarding

NAME                                              DESIRED   CURRENT   READY   AGE   CONTAINERS                                                                                                                                                                                                                                                                                     IMAGES                                                                                                                                                                                                                                                                                                                                                                                                                                                                                                                                                                                                                                                                                                                                                                                                                                                                         SELECTOR
replicaset.apps/onboarding-deployment-95f5dc897   5         5         0       61m   dds-bridge,amr-fleet-management,vda5050-ros2-bridge,amr-realsense,amr-ros-base-camera-tf,amr-aaeon-amr-interface,amr-ros-base-teleop,amr-battery-bridge,amr-object-detection,imu-madgwick-filter,robot-localization,amr-collab-slam,amr-fastmapping,amr-nav2,amr-wandering,amr-vda-navigator   10.237.22.198:30003/intel/eclipse/zenoh-bridge-dds:0.5.0-beta.9,10.237.22.198:30003/intel/amr-fleet-management:2023.1,10.237.22.198:30003/intel/amr-vda5050-ros2-bridge:2023.1,10.237.22.198:30003/intel/amr-realsense:2023.1,10.237.22.198:30003/intel/amr-ros-base-camera-tf:2023.1,10.237.22.198:30003/intel/amr-aaeon-amr-interface:2023.1,10.237.22.198:30003/intel/amr-ros-base-teleop:2023.1,10.237.22.198:30003/intel/amr-battery-bridge:2023.1,10.237.22.198:30003/intel/amr-object-detection:2023.1,10.237.22.198:30003/intel/amr-imu-madgwick-filter:2023.1,10.237.22.198:30003/intel/amr-robot-localization:2023.1,10.237.22.198:30003/intel/amr-collab-slam:2023.1,10.237.22.198:30003/intel/amr-fastmapping:2023.1,10.237.22.198:30003/intel/amr-nav2:2023.1,10.237.22.198:30003/intel/amr-wandering:2023.1,10.237.22.198:30003/intel/amr-vda-navigator:2023.1   app.kubernetes.io/instance=onboarding-abcxzy,app.kubernetes.io/name=onboarding,pod-template-hash=95f5dc897
For
amr-pengo, run:kubectl get all --output=wide --namespace onboarding-pengo
Verify that the Docker* images are present on the Robot:
$ docker images

 <Control_Plane_IP>:30003/intel/amr-ros-base-camera-tf                      latest        31735754089b   2 days ago      8.25GB
 <Control_Plane_IP>:30003/intel/amr-wandering                               latest        31735754089b   2 days ago      8.25GB
 <Control_Plane_IP>:30003/intel/amr-fastmapping                             latest        5c1bbefc1d17   2 days ago      2.28GB
 <Control_Plane_IP>:30003/intel/amr-collab-slam                             latest        415975276b1f   2 days ago      3.24GB
 <Control_Plane_IP>:30003/intel/amr-aaeon-amr-interface                     latest        5d94f57da0d1   2 days ago      2.37GB
 <Control_Plane_IP>:30003/intel/amr-realsense                               latest        1dab67f4d287   2 days ago      3GB
 <Control_Plane_IP>:30003/intel/amr-ros-base-camera-tf                      latest        0ac635f5633f   2 days ago      1.76GB
 <Control_Plane_IP>:30003/intel/amr-nav2                                    latest        769353e041bf   2 days ago      3.55GB
 <Control_Plane_IP>:30003/intel/amr-kobuki                                  latest        799ed6f79385   2 days ago      3.06GB
 <Control_Plane_IP>:30003/intel/amr-fleet-management                        latest        e91bf2815f65   2 days ago      1.79GB
 <Control_Plane_IP>:30003/intel/amr-vda-navigator                           latest        499c0c09b685   2 days ago      2.08GB
 <Control_Plane_IP>:30003/intel/amr-vda5050-ros2-bridge                     latest        4e8282a666be   2 days ago      2.06GB
 <Control_Plane_IP>:30003/intel/eclipse/zenoh-bridge-dds                    0.5.0-beta.9  1a5e41449966   9 months ago    86.1MB
 <Control_Plane_IP>:30003/intel/node-feature-discovery                      v0.9.0        00019dda899b   13 months ago   123MB
Note
Pod deployment may take a while because of the size of the Docker* containers from the pod. If you get an error after the deployment, wait a few minutes. The pods automatically restart, and the error goes away. If the error persists after a few automatic restarts, restart the pod manually from the control plane:
$ kubectl rollout restart deployment wandering-deployment -n wandering
Verify that the Docker* container is running on the Robot:
$ docker ps

 CONTAINER ID   IMAGE                                               COMMAND                  CREATED        STATUS        PORTS     NAMES
 86184dab6d92   10.237.22.39:30003/intel/amr-ros-base-camera-tf    "/bin/bash -c 'sourc…"   About a minute ago   Up About a minute             k8s_amr-ros-base-teleop_wandering-deployment-86d6b669d6-rzlgr_wandering_c00ecd97-2217-4f4f-a62c-9f99bc44ac7d_1
 9d19c163076f   10.237.22.39:30003/intel/amr-wandering             "/bin/bash -c 'sourc…"   About a minute ago   Up About a minute             k8s_amr-wandering_wandering-deployment-86d6b669d6-rzlgr_wandering_c00ecd97-2217-4f4f-a62c-9f99bc44ac7d_0
 b9f03850310e   10.237.22.39:30003/intel/amr-nav2                  "/bin/bash -c 'sourc…"   About a minute ago   Up About a minute             k8s_amr-nav2_wandering-deployment-86d6b669d6-rzlgr_wandering_c00ecd97-2217-4f4f-a62c-9f99bc44ac7d_0
 8fb3fb882505   10.237.22.39:30003/intel/amr-fastmapping           "/bin/bash -c 'sourc…"   About a minute ago   Up About a minute             k8s_amr-fastmapping_wandering-deployment-86d6b669d6-rzlgr_wandering_c00ecd97-2217-4f4f-a62c-9f99bc44ac7d_0
 1f122686f8e1   10.237.22.39:30003/intel/amr-collab-slam           "/bin/bash -c 'sourc…"   About a minute ago   Up About a minute             k8s_amr-collab-slam_wandering-deployment-86d6b669d6-rzlgr_wandering_c00ecd97-2217-4f4f-a62c-9f99bc44ac7d_0
 ee7e6cd8b50a   10.237.22.39:30003/intel/amr-aaeon-amr-interface   "/bin/bash -c 'sourc…"   About a minute ago   Up About a minute             k8s_amr-aaeon-amr-interface_wandering-deployment-86d6b669d6-rzlgr_wandering_c00ecd97-2217-4f4f-a62c-9f99bc44ac7d_0
 009efc5405af   10.237.22.39:30003/intel/amr-ros-base-camera-tf    "/bin/bash -c 'sourc…"   About a minute ago   Up About a minute             k8s_amr-ros-base-camera-tf_wandering-deployment-86d6b669d6-rzlgr_wandering_c00ecd97-2217-4f4f-a62c-9f99bc44ac7d_0
 1a6409b8c361   10.237.22.39:30003/intel/amr-realsense             "/bin/bash -c 'sourc…"   About a minute ago   Up About a minute             k8s_amr-realsense_wandering-deployment-86d6b669d6-rzlgr_wandering_c00ecd97-2217-4f4f-a62c-9f99bc44ac7d_0
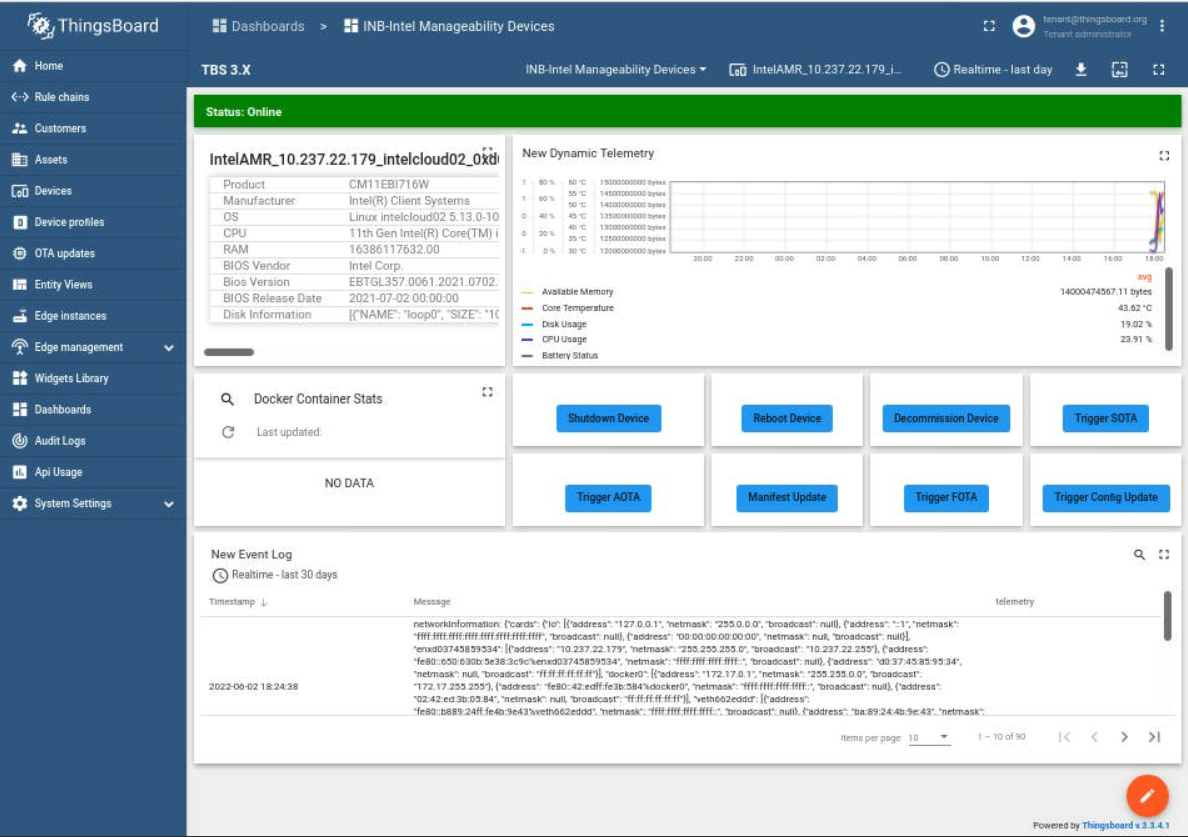
After the Onboarding process is finished, the
Firmware UpdateandOperating System Updateare triggered automatically. If you want to start the update manually, see OTA Updates.
Adding Robots After the Initial Robot Setup#
The manufacturer, rendezvous, and owner must still be running on the FDO server.
Make sure that you meet the Prerequisites.
Run all Robot steps in Configure the Robot and the FDO Server for the Onboarding Flow.
Run all Robot steps in Prepare the Environment Needed to Build the FDO Docker* Images.
For step 4, set a different
DEVICE_SERIAL_NUMBERthan for other onboarded robots.
Build the fdo-client image on the Robot (Build FDO Docker* Images step 1).
Run steps 5-15 in Onboard.
For step 8, use the
DEVICE_SERIAL_NUMBERset in step 3.
Hosts Cleanup#
Warning
Doing these steps erases most of the work done in previouse steps, so only do these steps when you want to clean up your machines.
To remake a setup after these cleanup steps, restart the onboarding process from the beginning.
Robot
CHOOSE_USER=root docker compose -f 01_docker_sdk_env/docker_compose/05_tutorials/fdo_client_onboard.yml down
FDO server terminal 1
docker compose -f 01_docker_sdk_env/docker_compose/02_edge_server/edge-server.all.yml down
Remove the Robot in the ThingsBoard* web interface.
Robot If the Robot was added to the Intel® Smart Edge Open cluster, remove it:
kubeadm reset
systemctl restart kubelet
Robot If the docker images are already running, remove these images:
docker rm -f $(docker ps | grep "<CONTROL_PLANE_IP>:30003/intel/" | awk '{ print $1 }')
docker rmi -f $(docker images | grep "<CONTROL_PLANE_IP>:30003/intel/" | awk '{ print $3 }')
Robot Remove the /etc/tc directory:
rm -rf /etc/tc
Troubleshooting#
If a docker compose error is encountered while building the FDO docker images, update the docker compose version:
curl -L " https://github.com/docker/compose/releases/download/v2.17.2/docker-compose-$(uname -s)-$(uname -m)" -o /usr/local/bin/docker-compose
FDO References#
Term |
Reference |
|---|---|
DMS |
N/A |
FDO |
|
FIDO |
|
RV |
https://fidoalliance.org/specs/FDO/FIDO-Device-Onboard-RD-v1.0-20201202.html |
Intel® SDO |
https://www.intel.com/content/www/us/en/internet-of-things/secure-device-onboard.html |