Troubleshooting for Robot Orchestration Tutorials#
Setting a Static IP#
Depending on your network setup, there are multiple ways to set a static IP.
In a home network, see your router’s instructions for how to set a static IP using your MAC address.
In a corporate network, contact your local support team for how to set a static IP.
To set it from your computer’s operating system:
Make sure that your computer has the correct date:
dateIf the date is incorrect, contact your local support team for help setting the correct date and time.
Find the gateway:
ip route | grep default
Name the servers by finding your interface name and replacing it:
nmcli device show <interface name> | grep IP4.DNS
Follow the “Static IP Address Assignment” steps from Ubuntu* here.
virtualenv Error#
If the following error is displayed:
Virtualenv location:
Warning: There was an unexpected error while activating your virtualenv. Continuing anyway…
Traceback (most recent call last):
File "./deploy.py", line 24, in <module>
from scripts import log_all
ImportError: cannot import name 'log_all' from 'scripts' (/home/test/.local/lib/python3.8/site-packages/scripts/__init__.py)
Remove the ~/.local/lib/python3.8/ directory and run the following
commands:
pip install --user -U pip
pip freeze --user | cut -d'=' -f1 | xargs pip install --user -U
Python Error#
If the following error is displayed:
Failed to install wget. b' ERROR: Command errored out with exit status 1:\n command: /usr/bin/python3 -c \'import sys, setuptools, tokenize; sys.argv[0] = \'"\'"\'/tmp/pip-install-6hcmet6a/wget/setup.py\'"\'"\'; __file__=\'"\'"\'/tmp/pip-install-6hcmet6a/wget/setup.py\'"\'"\';f=getattr(tokenize, \'"\'"\'open\'"\'"\', open)(__file__);code=f.read().replace(\'"\'"\'\\r\\n\'"\'"\', \'"\'"\'\\n\'"\'"\');f.close();exec(compile(code, __file__, \'"\'"\'exec\'"\'"\'))\' egg_info --egg-base /tmp/pip-pip-egg-info-7_3nl4xa\n cwd: /tmp/pip-install-6hcmet6a/wget/\n Complete output (17 lines):\n Traceback (most recent call last):\n File "<string>", line 1, in <module>\n File "/tmp/pip-install-6hcmet6a/wget/setup.py", line 15, in <module>\n setup(\n File "/usr/local/lib/python3.8/dist-packages/setuptools/_distutils/core.py", line 147, in setup\n _setup_distribution = dist = klass(attrs)\n File "/usr/local/lib/python3.8/dist-packages/setuptools/dist.py", line 476, in __init__\n _Distribution.__init__(\n File "/usr/local/lib/python3.8/dist-packages/setuptools/_distutils/dist.py", line 280, in __init__\n self.finalize_options()\n File "/usr/local/lib/python3.8/dist-packages/setuptools/dist.py", line 899, in finalize_options\n for ep in sorted(loaded, key=by_order):\n File "/usr/local/lib/python3.8/dist-packages/setuptools/dist.py", line 898, in <lambda>\n loaded = map(lambda e: e.load(), filtered)\n File "/usr/local/lib/python3.8/dist-packages/setuptools/_vendor/importlib_metadata/__init__.py", line 196, in load\n return functools.reduce(getattr, attrs, module)\n AttributeError: type object \'Distribution\' has no attribute \'_finalize_feature_opts\'\n ----------------------------------------\nERROR: Command errored out with exit status 1: python setup.py egg_info Check the logs for full command output.\nWARNING: You are using pip version 20.2.4; however, version 22.2.2 is available.\nYou should consider upgrading via the \'/usr/bin/python3 -m pip install --upgrade pip\' command.\n'
Remove the ~/.local/lib/python3.8/ directory, and run the following
commands:
python3 -m pip uninstall setuptools
python3 -m pip install testresources
python3 -m pip install launchpadlib
python3 -m pip install setuptools
python3 -m pip install --user -U pip
termcolor Error#
If the following error is displayed:
Failed to install termcolor. b'/usr/local/lib/python3.8/dist-packages/pkg_resources/__init__.py:122:
python3 -m pip uninstall setuptools
python3 -m pip install testresources
python3 -m pip install setuptools
Failed OpenSSL Download#
If the following error is displayed:
FAILED - RETRYING: OpenSSL download from https://www.openssl.org/source/openssl-1.1.1i.tar.gz (4 retries left).
FAILED - RETRYING: OpenSSL download from https://www.openssl.org/source/openssl-1.1.1i.tar.gz (4 retries left).
FAILED - RETRYING: OpenSSL download from https://www.openssl.org/source/openssl-1.1.1i.tar.gz (3 retries left).
FAILED - RETRYING: OpenSSL download from https://www.openssl.org/source/openssl-1.1.1i.tar.gz (3 retries left).
FAILED - RETRYING: OpenSSL download from https://www.openssl.org/source/openssl-1.1.1i.tar.gz (2 retries left).
FAILED - RETRYING: OpenSSL download from https://www.openssl.org/source/openssl-1.1.1i.tar.gz (2 retries left).
FAILED - RETRYING: OpenSSL download from https://www.openssl.org/source/openssl-1.1.1i.tar.gz (1 retries left).
FAILED - RETRYING: OpenSSL download from https://www.openssl.org/source/openssl-1.1.1i.tar.gz (1 retries left)
Run the following commands:
wget --directory-prefix=/tmp http://certificates.intel.com/repository/certificates/IntelSHA2RootChain-Base64.zip

sudo unzip -o /tmp/IntelSHA2RootChain-Base64.zip -d /usr/local/share/ca-certificates/

rm /tmp/IntelSHA2RootChain-Base64.zip

update-ca-certificates
“Isecl control plane IP not set” Error#
If the following error is displayed:
TASK [Check control plane IP] ***************************************************************************************************************************************************************************************************************
task path: /root/dek/roles/security/isecl/common/tasks/precheck.yml:7
Wednesday 16 February 2022  15:36:34 +0000 (0:00:00.047)       0:00:05.373 ****
fatal: [node01]: FAILED! => {
   "changed": false
}

MSG:

Isecl control plane IP not set!
fatal: [node02]: FAILED! => {
   "changed": false
}

MSG:

Isecl control plane IP not set!
fatal: [controller]: FAILED! => {
   "changed": false
}

MSG:

Isecl control plane IP not set!
Update the ~/dek/inventory/default/group_vars/all/10-default.yml file
with:
# Install isecl attestation components (TA, ihub, isecl k8s controller and scheduler extension)
platform_attestation_node: false
“PCCS IP address not set” Error#
If the following error is displayed:
TASK [Check PCCS IP address] ****************************************************************************************************************************************************************************************************************
task path: /root/dek/roles/infrastructure/provision_sgx_enabled_platform/tasks/param_precheck.yml:7
Wednesday 16 February 2022  15:39:59 +0000 (0:00:00.060)       0:00:05.688 ****
fatal: [node01]: FAILED! => {
   "changed": false
}

MSG:

PCCS IP address not set!
fatal: [node02]: FAILED! => {
   "changed": false
}

MSG:

PCCS IP address not set!
fatal: [controller]: FAILED! => {
   "changed": false
}

MSG:

PCCS IP address not set!
Update the ~/dek/inventory/default/group_vars/all/10-default.yml file
with:
### Software Guard Extensions
# SGX requires kernel 5.11+, SGX enabled in BIOS and access to PCC service
sgx_enabled: false
“no supported NIC is selected” Error#
If the following error is displayed:
sriovnetwork.sriovnetwork.openshift.io/sriov-vfio-network-c1p1 unchanged
STDERR:
Error from server (no supported NIC is selected by the nicSelector in CR sriov-netdev-net-c0p0): error when creating "sriov-netdev-net-c0p0-sriov_network_node_policy.yml": admission webhook "operator-webhook.sriovnetwork.openshift.io" denied the request: no supported NIC is selected by the nicSelector in CR sriov-netdev-net-c0p0
Error from server (no supported NIC is selected by the nicSelector in CR sriov-netdev-net-c1p0): error when creating "sriov-netdev-net-c1p0-sriov_network_node_policy.yml": admission webhook "operator-webhook.sriovnetwork.openshift.io" denied the request: no supported NIC is selected by the nicSelector in CR sriov-netdev-net-c1p0
Error from server (no supported NIC is selected by the nicSelector in CR sriov-vfio-pci-net-c0p1): error when creating "sriov-vfio-pci-net-c0p1-sriov_network_node_policy.yml": admission webhook "operator-webhook.sriovnetwork.openshift.io" denied the request: no supported NIC is selected by the nicSelector in CR sriov-vfio-pci-net-c0p1
Error from server (no supported NIC is selected by the nicSelector in CR sriov-vfio-pci-net-c1p1): error when creating "sriov-vfio-pci-net-c1p1-sriov_network_node_policy.yml": admission webhook "operator-webhook.sriovnetwork.openshift.io" denied the request: no supported NIC is selected by the nicSelector in CR sriov-vfio-pci-net-c1p1
Update the ~/dek/inventory/default/group_vars/all/10-default.yml file
with:
sriov_network_operator_enable: false

## SR-IOV Network Operator configuration
sriov_network_operator_configure_enable: false
“Unexpected templating type error”#
If the following error is displayed:
MSG:
AnsibleError: Unexpected templating type error occurred on (# SPDX-License-Identifier: Apache-2.0
# Copyright (c) 2020 Intel Corporation
apiVersion: v1
kind: ConfigMap
metadata:
   name: grafana-datasources
   namespace: telemetry
   labels:
      grafana_datasource: '1'
data:
   prometheus-tls.yaml: |-
      apiVersion: 1
      datasources:
      - name: Prometheus-TLS
         access: proxy
         editable: true
         orgId: 1
         type: prometheus
         url: https://prometheus:9099
         withCredentials: true
         isDefault: true
         jsonData:
            tlsAuth: true
            tlsAuthWithCACert: true
         secureJsonData:
            tlsCACert: |
               {{ telemetry_root_ca_cert.stdout | trim | indent(width=13, indentfirst=False) }}
            tlsClientCert: |
               {{ telemetry_grafana_cert.stdout | trim | indent(width=13, indentfirst=False) }}
            tlsClientKey: |
               {{ telemetry_grafana_key.stdout | trim | indent(width=13, indentfirst=False) }}
         version: 1
         editable: false
): do_indent() got an unexpected keyword argument 'indentfirst'
Update the
~/dek/roles/telemetry/grafana/templates/prometheus-tls-datasource.yml
file with:
-             {{ telemetry_root_ca_cert.stdout | trim | indent(width=13, indentfirst=False) }}
+             {{ telemetry_root_ca_cert.stdout | trim | indent(width=13, first=False) }}
-             {{ telemetry_grafana_cert.stdout | trim | indent(width=13, indentfirst=False) }}
+             {{ telemetry_grafana_cert.stdout | trim | indent(width=13, first=False) }}
-             {{ telemetry_grafana_key.stdout | trim | indent(width=13, indentfirst=False) }}
+             {{ telemetry_grafana_key.stdout | trim | indent(width=13, first=False) }}
“Wait till all Harbor resources ready” Message#
If the following log is displayed:
TASK [kubernetes/cni : Wait till all Harbor resources ready] ********************************************************************************************************************************************************************************
task path: /home/user/dek/roles/kubernetes/cni/tasks/main.yml:20
Tuesday 16 November 2021 14:41:58 +0100 (0:00:00.070) 0:04:39.646 ******
FAILED - RETRYING: Wait till all Harbor resources ready (60 retries left).
FAILED - RETRYING: Wait till all Harbor resources ready (59 retries left).
FAILED - RETRYING: Wait till all Harbor resources ready (58 retries left).
FAILED - RETRYING: Wait till all Harbor resources ready (57 retries left).
FAILED - RETRYING: Wait till all Harbor resources ready (56 retries left).
FAILED - RETRYING: Wait till all Harbor resources ready (55 retries left).
FAILED - RETRYING: Wait till all Harbor resources ready (54 retries left).
FAILED - RETRYING: Wait till all Harbor resources ready (53 retries left).
FAILED - RETRYING: Wait till all Harbor resources ready (52 retries left).
FAILED - RETRYING: Wait till all Harbor resources ready (51 retries left).
FAILED - RETRYING: Wait till all Harbor resources ready (50 retries left).
Wait approximately 30 minutes. The Intel® Smart Edge Open deployment script waits for the Harbor resources to be ready.
Installation Stuck#
If the installation remains stuck with the following log:
TASK [infrastructure/os_setup : enable UFW] *************************************************************************************************************************************************************************************************
task path: /root/dek/roles/infrastructure/os_setup/tasks/ufw_enable_debian.yml:12
Wednesday 16 February 2022  15:53:04 +0000 (0:00:01.627)       0:08:03.425 ****
NOTIFIED HANDLER reboot server for controller
changed: [controller] => {
   "changed": true,
   "commands": [
      "/usr/sbin/ufw status verbose",
      "/usr/bin/grep -h '^### tuple' /lib/ufw/user.rules /lib/ufw/user6.rules /etc/ufw/user.rules /etc/ufw/user6.rules /var/lib/ufw/user.rules /var/lib/ufw/user6.rules",
      "/usr/sbin/ufw -f enable",
      "/usr/sbin/ufw status verbose",
      "/usr/bin/grep -h '^### tuple' /lib/ufw/user.rules /lib/ufw/user6.rules /etc/ufw/user.rules /etc/ufw/user6.rules /var/lib/ufw/user.rules /var/lib/ufw/user6.rules"
   ]
}

MSG:

Status: active
Logging: on (low)
Default: deny (incoming), allow (outgoing), deny (routed)
New profiles: skip

To                         Action      From
--                         ------      ----
22/tcp                     ALLOW IN    Anywhere
22/tcp (v6)                ALLOW IN    Anywhere (v6)
Type Ctrl-c, and restart the installation. (Run the ./deploy.sh
script again.)
Pod Remains in “Terminating” State after Uninstall#
After uninstall, if the pod does not stop but remains in “Terminating” state, enter the following commands:
kubectl get pods -n fleet-management
kubectl delete -n <pod_name_from_above_command> --grace-period=0 --force
ansible-playbook AMR_server_containers/01_docker_sdk_env/docker_orchestration/ansible-playbooks/02_edge_server/fleet_management/fleet_management_playbook_uninstall.yaml
docker compose Failure#
If you see an error message that docker compose fails with some variables
not defined, add the environment variables to .bashrc so that they are
available to all terminals:
export DOCKER_BUILDKIT=1
export COMPOSE_DOCKER_CLI_BUILD=1
export DOCKER_HOSTNAME=$(hostname)
export DOCKER_USER_ID=$(id -u)
export DOCKER_GROUP_ID=$(id -g)
export DOCKER_USER=$(whoami)
# Check with command
env | grep DOCKER
Keytool Not Installed#
The keytool utility is used to create the certificate store. Install any preferred Java* version. For development, Intel used:
sudo apt install default-jre
# Check your Java version:
java -version
Corrupt Database or Nonresponsive Server#
Reset the ThingsBoard* server with the following steps.
Uninstall the playbook:
ansible-playbook AMR_server_containers/01_docker_sdk_env/docker_orchestration/ansible-playbooks/02_edge_server/fleet_management/fleet_management_playbook_uninstall.yaml
After uninstalling the playbook, wait several seconds for all fleet related containers to stop. Verify that there are no fleet containers running:
docker ps | grep fleet
Reinstall the playbook:
ansible-playbook AMR_server_containers/01_docker_sdk_env/docker_orchestration/ansible-playbooks/02_edge_server/fleet_management/fleet_management_playbook_install.yaml
ThingsBoard* Server Errors#
These errors can be fixed directly on the hosting machine using Docker* Compose. However, this requires automated steps using Ansible* playbooks, so try these fixes last.
Reset the database to a pristine state (without customizations from Intel®):
# delete database and start the server
# The state of server is - without any customization from Intel.
sudo rm -rf ~/.mytb-data/db ~/.mytb-data/.firstlaunch ~/.mytb-data/.upgradeversion
docker compose -f 01_docker_sdk_env/docker_compose/02_edge_server/edge-server.all.yml down
CHOOSE_USER=thingsboard docker compose -f 01_docker_sdk_env/docker_compose/02_edge_server/edge-server.all.yml up fleet-management
Note
This only restarts the ThingsBoard* server, without Intel® Smart Edge Open.
Reset the database to the preconfigured state (with customizations from Intel), and restart the server:
# Start the server with old/corrupted database
CHOOSE_USER=thingsboard docker compose -f 01_docker_sdk_env/docker_compose/02_edge_server/edge-server.all.yml up fleet-management
# attach to running container from another terminal:
docker exec -it  edge-server-sdk-fleet-management bash

# inside the container: replace the database with Intel-customized-database:
# Just press tb<tab>. The tb-server-reset-db.sh is present in /usr/local/bin folder, so it is accessible from anywhere.
tb-server-reset-db.sh
# When asked press y and enter. Done.
# Now exit the container. and run below commands again to re-launch the server with preconfigured-state of database (With Intel Customizations):
docker compose -f 01_docker_sdk_env/docker_compose/02_edge_server/edge-server.all.yml down
CHOOSE_USER=thingsboard docker compose -f 01_docker_sdk_env/docker_compose/02_edge_server/edge-server.all.yml up fleet-management
Note
This only restarts the ThingsBoard* server, without Intel® Smart Edge Open.
When you deploy the ThingsBoard* container using Intel® Smart Edge Open Ansible* playbook, sometimes the server cannot start due to following error:
edge-server-sdk-fleet-management | 2021-11-25 15:24:34,345 [main] ERROR com.zaxxer.hikari.pool.HikariPool - HikariPool-1 - Exception during pool initialization.
edge-server-sdk-fleet-management | org.postgresql.util.PSQLException: Connection to localhost:5432 refused. Check that the hostname and port are correct and that the postmaster is accepting TCP/IP connections.
edge-server-sdk-fleet-management |      at org.postgresql.core.v3.ConnectionFactoryImpl.openConnectionImpl(ConnectionFactoryImpl.java:303)
edge-server-sdk-fleet-management |      at org.postgresql.core.ConnectionFactory.openConnection(ConnectionFactory.java:51)
edge-server-sdk-fleet-management |      at org.postgresql.jdbc.PgConnection.<init>(PgConnection.java:223)
edge-server-sdk-fleet-management |      at org.postgresql.Driver.makeConnection(Driver.java:465)
edge-server-sdk-fleet-management |      at org.postgresql.Driver.connect(Driver.java:264)
If, after waiting for some time, the server is not up and running, and the server URL localhost:9090 is not showing the server page, uninstall and reinstall the playbook:
ansible-playbook AMR_server_containers/01_docker_sdk_env/docker_orchestration/ansible-playbooks/02_edge_server/fleet_management/fleet_management_playbook_uninstall.yaml
ansible-playbook AMR_server_containers/01_docker_sdk_env/docker_orchestration/ansible-playbooks/02_edge_server/fleet_management/fleet_management_playbook_install.yaml
Result: The database is reset to the preconfigured database provided by Intel.
Fleet Management Server Dashboard over LAN Issues#
If the Dashboard is not accessible from the client, the first step is to make sure that the client and server nodes are in the same subnet. This helper page can be used to find out: https://www.meridianoutpost.com/resources/etools/network/two-ips-on-same-network.php
If the client and server are in the same subnet, then it is possible that you are using proxies that prevent the connection. To check this on Linux, run the following command:
wget -q -T 3 -t 3 --no-proxy http://<IP>:9090/ && echo "COMMAND PASSED"
Where <IP> is the IP of your server.
If COMMAND PASSED is displayed, then you should configure your browser to
NOT use proxy when accessing the IP/hostname of the server.
Playbook Install Errors#
If you start the basic fleet management server right after a server reboot, you may encounter the error:
fatal: [localhost]: FAILED! => {"changed": false, "msg": "Logging into 10.237.22.88:30003 for user admin
failed - 500 Server Error for http+docker://localhost/v1.41/auth: Internal Server Error
(\"Get \"https://10.237.22.88:30003/v2/\": dial tcp 10.237.22.88:30003: connect: connection refused\")"}
Wait two minutes until the server is up and running.
Verify that all pods are running and no errors are reported:
kubectl get all -A
After all pods and services are up and running, restart the basic fleet management server:
ansible-playbook AMR_server_containers/01_docker_sdk_env/docker_orchestration/ansible-playbooks/02_edge_server/fleet_management/fleet_management_playbook_install.yaml
Battery Status Not Available in Dashboard#
To verify that the battery is correctly reported by the robot, check it on the client side:
python
>>> import psutil
>>> battery = psutil.sensors_battery()
>>> print("Battery percentage : ", battery.percent)
Battery percentage : 43
When the battery bridge is installed in robot, the 2 commands below are
equivalent. So when you launch kobuki node, it publishes battery percentage in
topic /sensors/battery_state. You can also do the same using the ros2 topic
pub command.
# Publish battery status
ros2 topic pub /sensors/battery_state sensor_msgs/msg/BatteryState "{percentage: 10}"
# or
launch kobuki image
source ros_entrypoint.sh
ros2 launch kobuki_node kobuki_node-composed-launch.py
Add New Clients to the Fleet Management Server#
New devices can be created when more basic fleet management clients are going to be deployed. Remember to specify the Device Profile with which to associate the Device. It impacts the associated Rule Chain too.
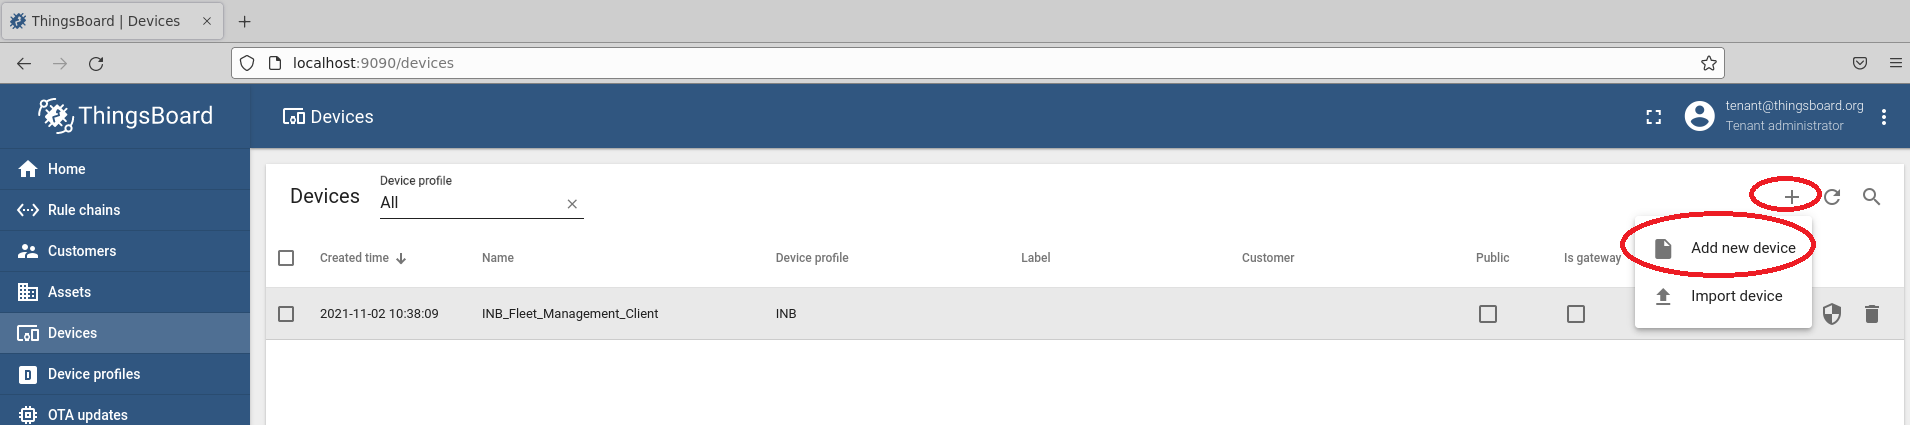
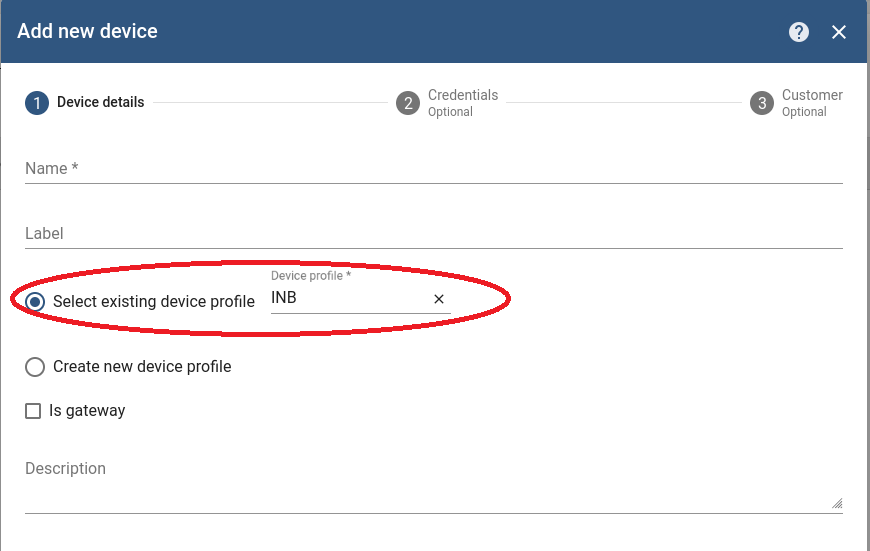
For configuring new basic fleet management clients (1-to-1 mapping), the new tokens of the new Devices can be retrieved with Copy access token.
battery-bridge-kernel-module Install Failure#
Follow the steps below:
cd components/amr_battery_bridge_kernel_module/src/
# uninstall battery-bridge-kernel-module
sudo ./module_install.sh -u
# check if below path exists
ls /sys/class/power_supply/BAT0
If the above path exists, then there is another kernel module occupying the place already and provided battery-bridge-kernel-module can not be installed.
In this case, the provided solution does work.
Pod Remains in “Terminating” State after Uninstall#
After uninstall, if the pod does not stop but remains in a “Terminating” state, enter the following commands:
kubectl get pods -n ovms-tls
kubectl delete -n <pod_name_from_above_command> --grace-period=0 --force
ansible-playbook AMR_server_containers/01_docker_sdk_env/docker_orchestration/ansible-playbooks/02_edge_server/openvino_model_server/ovms_playbook_uninstall.yaml
Permission denied for Fleet Management SOTA/FOTA update#
If the FOTA firmware update in the amr-fleet-management container fails with an error message
Firmware Update Aborted: File unrar failed: error: [Errno 13] Permission denied: '/usr/bin/docker'execute the following commands inside the amr-fleet-management container on the robot target:
docker exec -it k8s_amr-fleet-management_onboarding-deployment-66b6b9847c-gmnvq_onboarding_428a3178-dc8f-4813-90ad-35bcd18cb26c_4 bash

export http_proxy=http://proxy-chain.intel.com:912
export https_proxy=http://proxy-chain.intel.com:912
apt-get update
apt-get install -fy
apt-get install apparmor-utils apparmor-notify apparmor-profiles apparmor-profiles-extra
aa-disable /etc/apparmor.d/usr.bin.inbm-dispatcher
systemctl restart inbm-dispatcher
The barometer-collectd is not Starting in Cluster of Fleet Management#
To load all available plugins and start collectd it is necessary to comment a line in
/opt/smartedge/collectd/configs/intel_pmu.conf.#LoadPlugin intel_pmuFor a Single Node, it is necessary to change the file on Control Plane.
For a Multi Node, it is necessary to change the file on all Edge Nodes, without change on the Control Plane.
See Get Started Guide for Robot Orchestration for Single Node and Multi Node deployment.
Example:
# SPDX-License-Identifier: Apache-2.0
# Copyright (c) 2020 Intel Corporation

#LoadPlugin intel_pmu

<Plugin intel_pmu>
  ReportHardwareCacheEvents true
  ReportKernelPMUEvents true
  ReportSoftwareEvents true
  Cores "[0-4]"
</Plugin>