Basic Fleet Management Use Case#
This tutorial describes how to:
From the ThingsBoard* GUI, command the robot to navigate to multiple locations.
Command the robot back to the docking station when its battery reaches the 40% threshold.
Prerequisites:
The server is configured with the Get Started Guide for Robot Orchestration.
The robot is onboarded with the Device Onboarding End-to-End Use Case.
VDA5050 ROS 2 Bridge and Multiple Destinations Order#
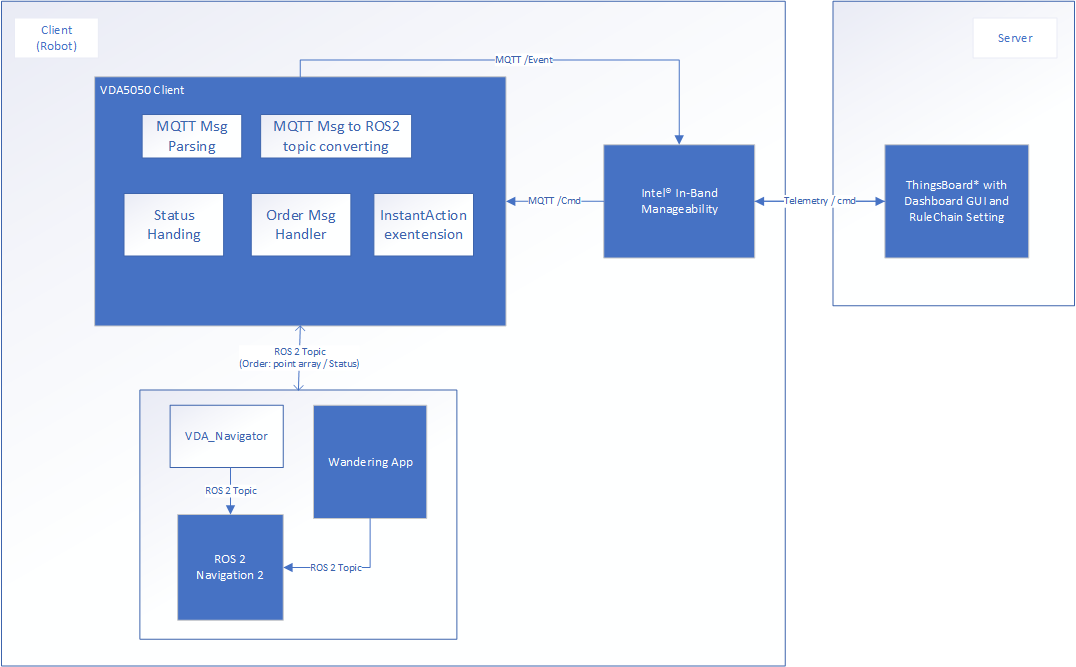
The VDA5050 ROS 2 bridge works as a bridge between VDA5050 specification compliance and the ROS 2 world. Specifically, it complies with VDA5050 V2.0 specification schemas.
The following software block diagram of the VDA5050 ROS 2 bridge shows internal software components, and the extra VDA_Navigator component as a ROS 2 node to handle interfacing to the ROS 2 Navigation 2 stack. You can extend the internal handlers and VDA_Navigator to fit your use cases.
Pause wandering from ThingsBoard*.
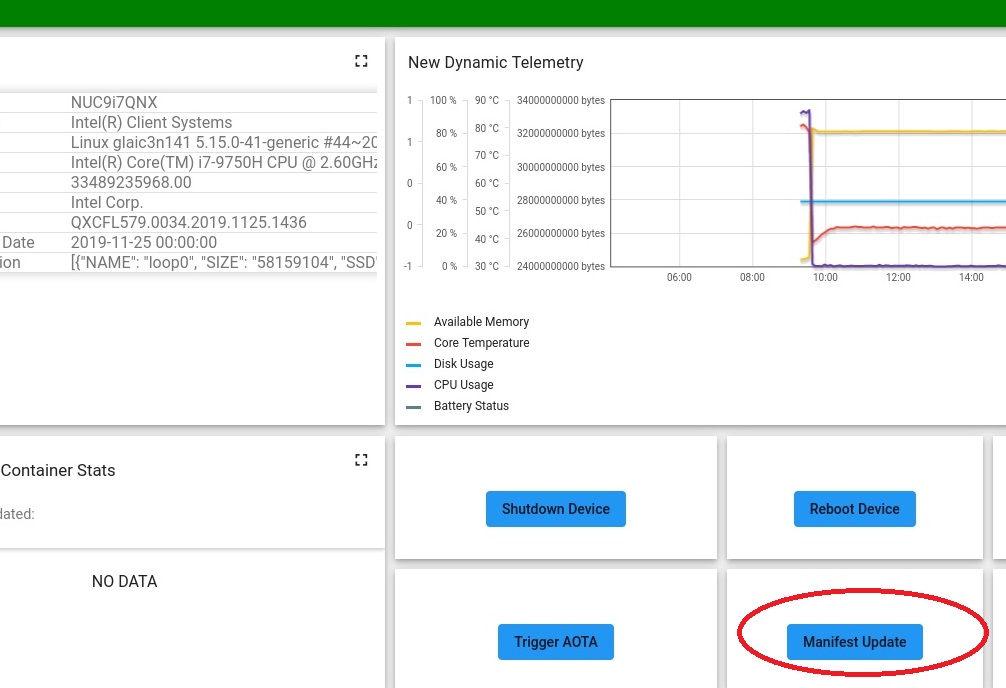
Click Manifest Update:
Replace the default command with the following VDA5050 json format embedded command:
<?xml version="1.0" encoding="UTF-8"?><manifest><type>cmd</type><cmd>custom</cmd><custom>
<data>{
   "headerId":0,
   "timestamp":"2022-08-03T11:40:03.12Z",
   "version":"1.0",
   "manufacturer":"Intel",
   "serialNumber":"12345678",
   "actions": [
   {
      "actionId":"0",
      "actionName":"ToggleWandering",
      "blockingType":"NONE",
      "actionParameters":[
      {
         "key":"pause",
         "value":true
      }]
   }]
}</data></custom></manifest>
Click Send. Intel® In-Band Manageability forwards the message to the VDA5050 ROS 2 bridge.
Instruct the robot to go to multiple navigation goals by adding them in the
nodesarray.Click Manifest Update.
Replace the default command with a command containing multiple navigation goals, for example:
<?xml version="1.1" encoding="UTF-8"?><manifest><type>cmd</type><cmd>custom</cmd><custom>
<data>{
"headerId": 0,
"timestamp":"2021-10-14T11:40:04.12Z",
"version":"1.0",
"manufacturer":"Intel",
"serialNumber":"12345678",
"orderId":"1235",
"orderUpdateId": 0,
"nodes":[
   {
      "nodeId":"A",
      "sequenceId": 7,
      "released": true,
      "nodePosition":{
         "x":0.3,
         "y":0.8,
         "theta":0,
         "mapId": "001"
      },
      "actions":[]
      },
      {
      "nodeId":"B",
      "sequenceId": 7,
      "released": true,
      "nodePosition":{
      "x":0.9,
      "y":0.8,
      "theta":0,
      "mapId": "001"
      },
      "actions":[]
      }
   ],
   "edges":[
      {
      edgeId": "edge9",
      "sequenceId": 0,
      "edgeDescription": "edge1",
      "released": false,
      "startNodeId": "Origin",
      "endNodeId": "AnotherNode",
      "maxSpeed": 0.0,
      "maxHeight": 0.0,
      "minHeight": 0.0,
      "orientation": 0.0,
      "direction": "straight",
      "rotationAllowed": true,
      "maxRotationSpeed": 0.0,
      "length": 0.0,
      "trajectory": {
         "degree": 0.0,
         "knotVector": [
            0.0,
            0.5,
            0.6,
            1.0
         ],
         "controlPoints": [
            {
            "x": 0.0,
            "y": 0.0,
            "weight": 0.0
            }]},
            "actions": []}]
      }</data> </custom></manifest>
Click Send. Intel® In-Band Manageability forwards the message to the VDA5050 ROS 2 bridge.
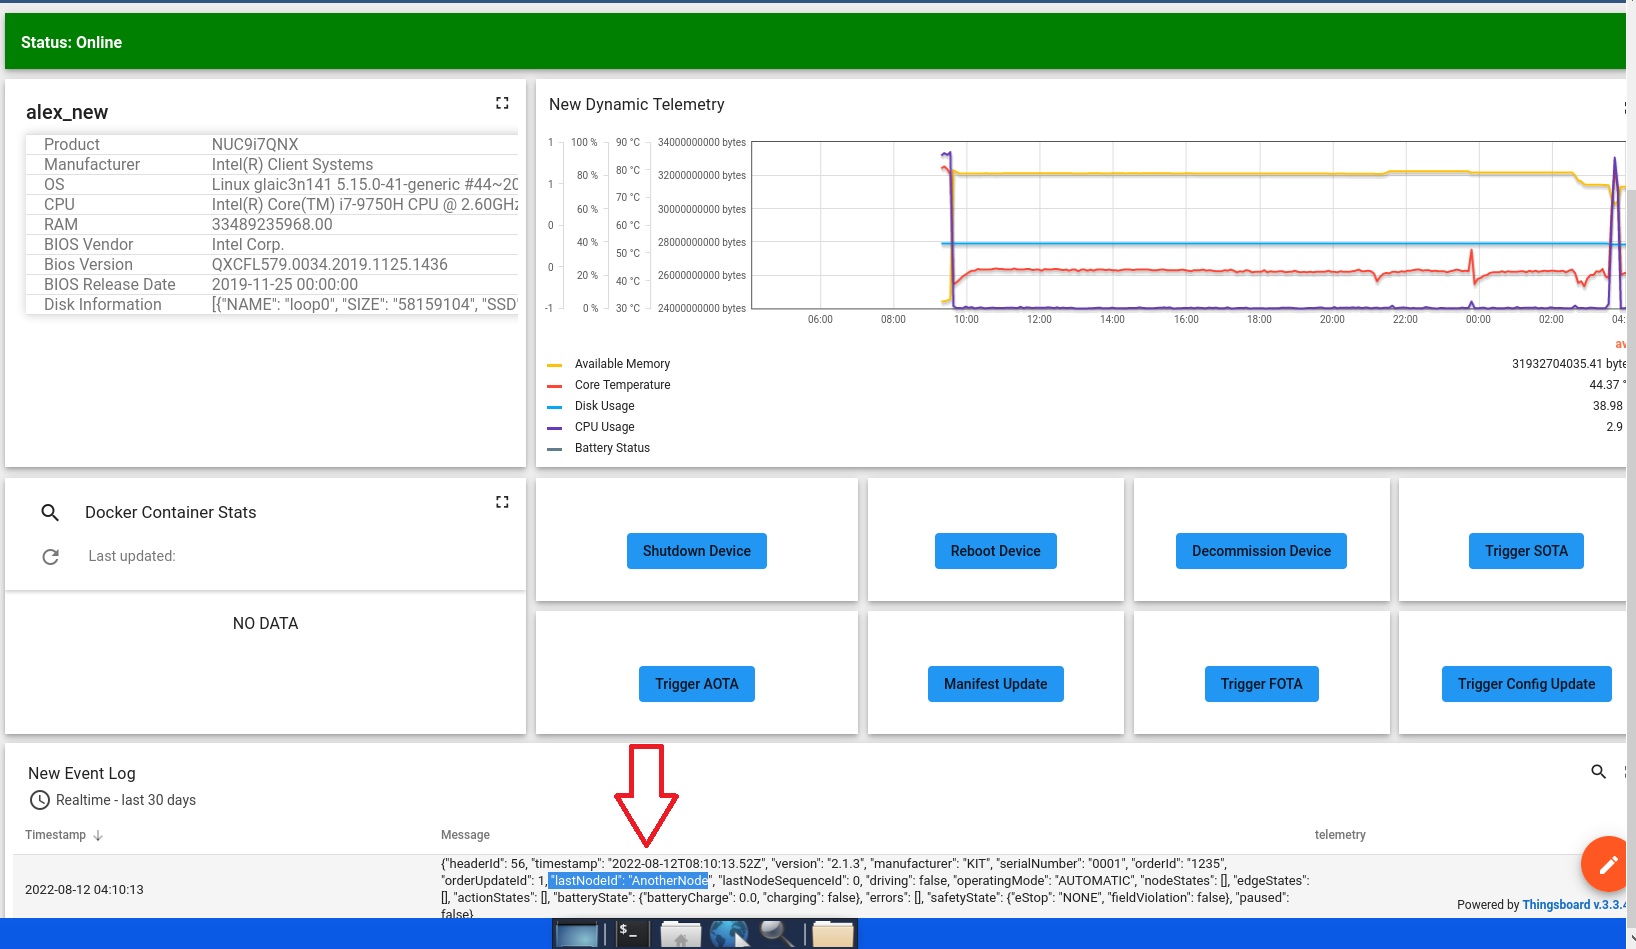
Expected result: A status update is sent to the ThingsBoard* Dashboard Event Log, and the robot starts navigating to the navigation goals.
Send a command to update the navigation goals by adding a new one “C”.
Note
The
orderIDremains the same;orderUpdateIdflags that this as an update from the previous instructions.Click Manifest Update.
Replace the command with:
<?xml version="1.0" encoding="UTF-8"?><manifest><type>cmd</type><cmd>custom</cmd><custom><data>{
"headerId": 0,
"timestamp":"2021-10-14T11:40:04.12Z",
"version":"1.0",
"manufacturer":"Intel",
"serialNumber":"12345678",
"orderId":"1235",
"orderUpdateId": 1,
"nodes":[
   {
   "nodeId":"B",
   "sequenceId": 7,
   "released": true,
   "nodePosition":{
   "x":0.9,
   "y":0.8,
   "theta":0,
   "mapId": "001"},
   "actions":[]},
   {
   "nodeId":"C",
   "sequenceId": 7,
   "released": true,
   "nodePosition":{
      "x":1.1,
      "y":1.1,
      "theta":0,
      "mapId": "001"},
   "actions":[]}],
   "edges":[
      {
      "edgeId": "edge2",
      "sequenceId": 0,
      "edgeDescription": "c",
      "released": false,
      "startNodeId": "B",
      "endNodeId": "C",
      "maxSpeed": 0.0,
      "maxHeight": 0.0,
      "minHeight": 0.0,
      "orientation": 0.0,
      "direction": "straight",
      "rotationAllowed": true,
      "maxRotationSpeed": 0.0,
      "length": 0.0,
      "trajectory": {
         "degree": 0.0,
         "knotVector": [
            0.0,
            0.5,
            0.6,
            1.0],
         "controlPoints": [{
            "x": 0.0,
            "y": 0.0,
            "weight": 0.0}]
         },
         "actions": []}]
   }</data> </custom></manifest>
Click Send. Intel® In-Band Manageability forwards the message to the VDA5050 ROS 2 bridge.
Expected result: A status update is sent to the ThingsBoard* Dashboard Event Log, and the robot starts navigating to the navigation goals, now including the C navigation goal.
Command the Robot Back to the Docking Station When its Battery Reaches the 40% Threshold#
Collaboration Diagram
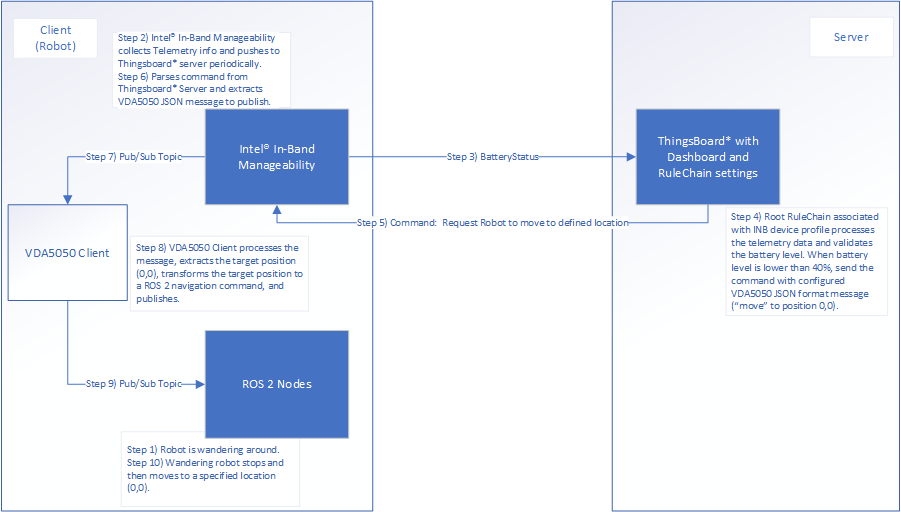
When a robot’s battery level is less than 40%, basic fleet management tells the robot to move to the origin position. The following diagram depicts the steps.
On the server, log into the basic fleet management server.
Open the basic fleet management dashboard:
Note
VNC interferes with the Intel® Smart Edge Open installation. Intel recommends that you open the basic fleet management dashboard on a different system, as the dashboard is accessible via internet.
# Open a browser, use controller IP and open:
<IP Address>:32764
Note
Use the following credentials:
account:
tenant@thingsboard.orgpassword:
tenant
If the fleet management server dashboard is not accessible on a system in the same network, check Troubleshooting for Robot Orchestration Tutorials, “Fleet Management Server Dashboard over LAN Issues”.
The following home page is loaded. Device Profiles and Devices are loaded with pre-configured data from Intel.
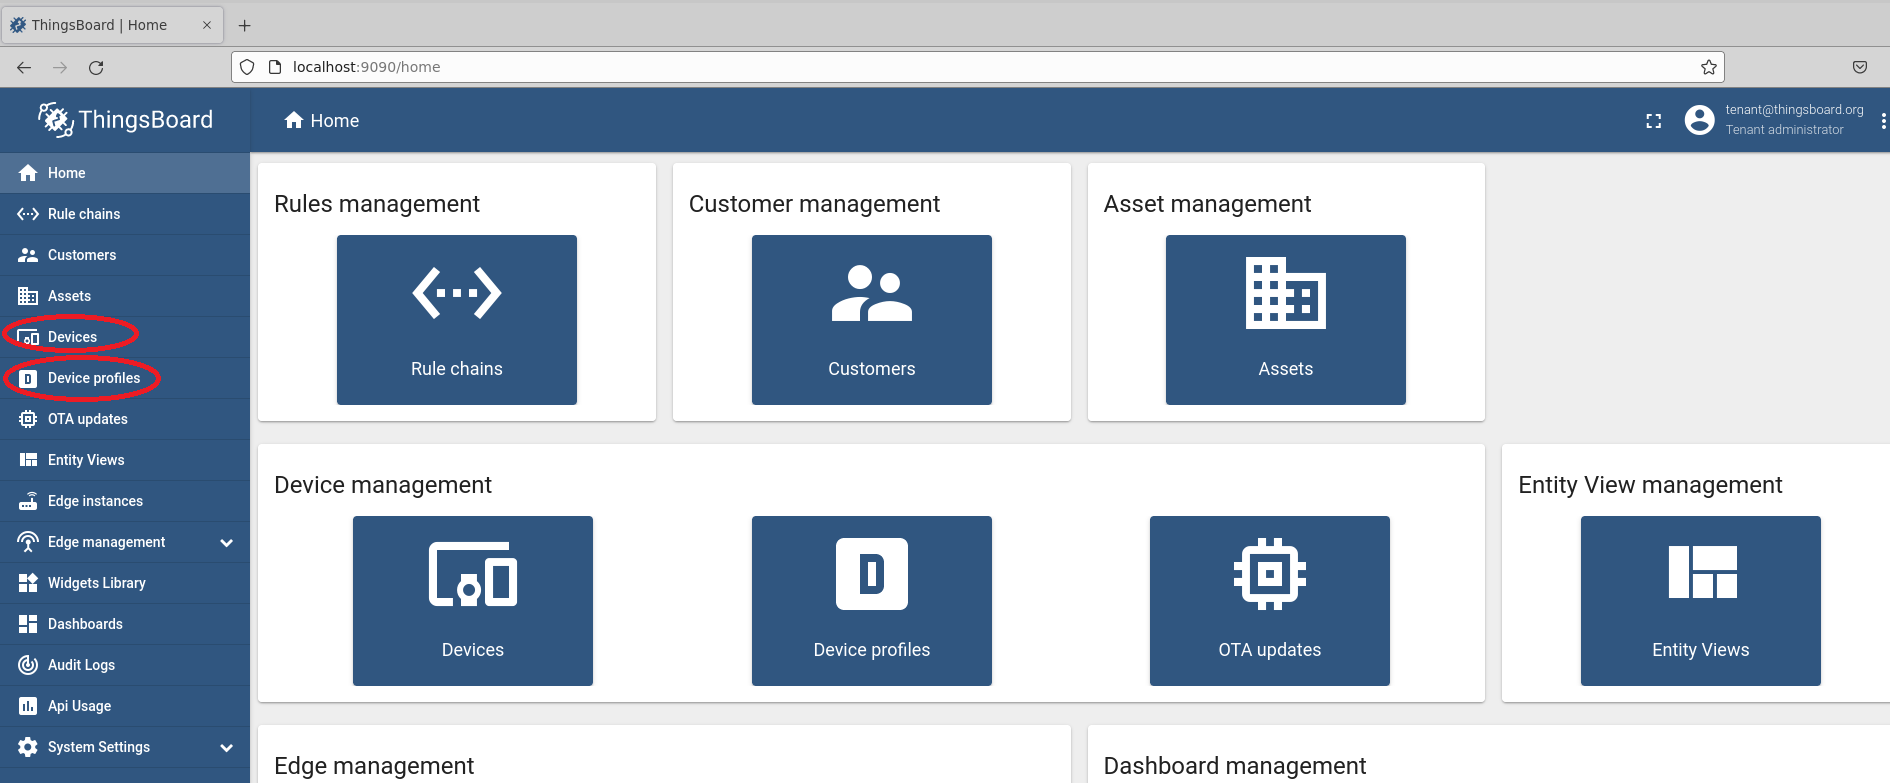
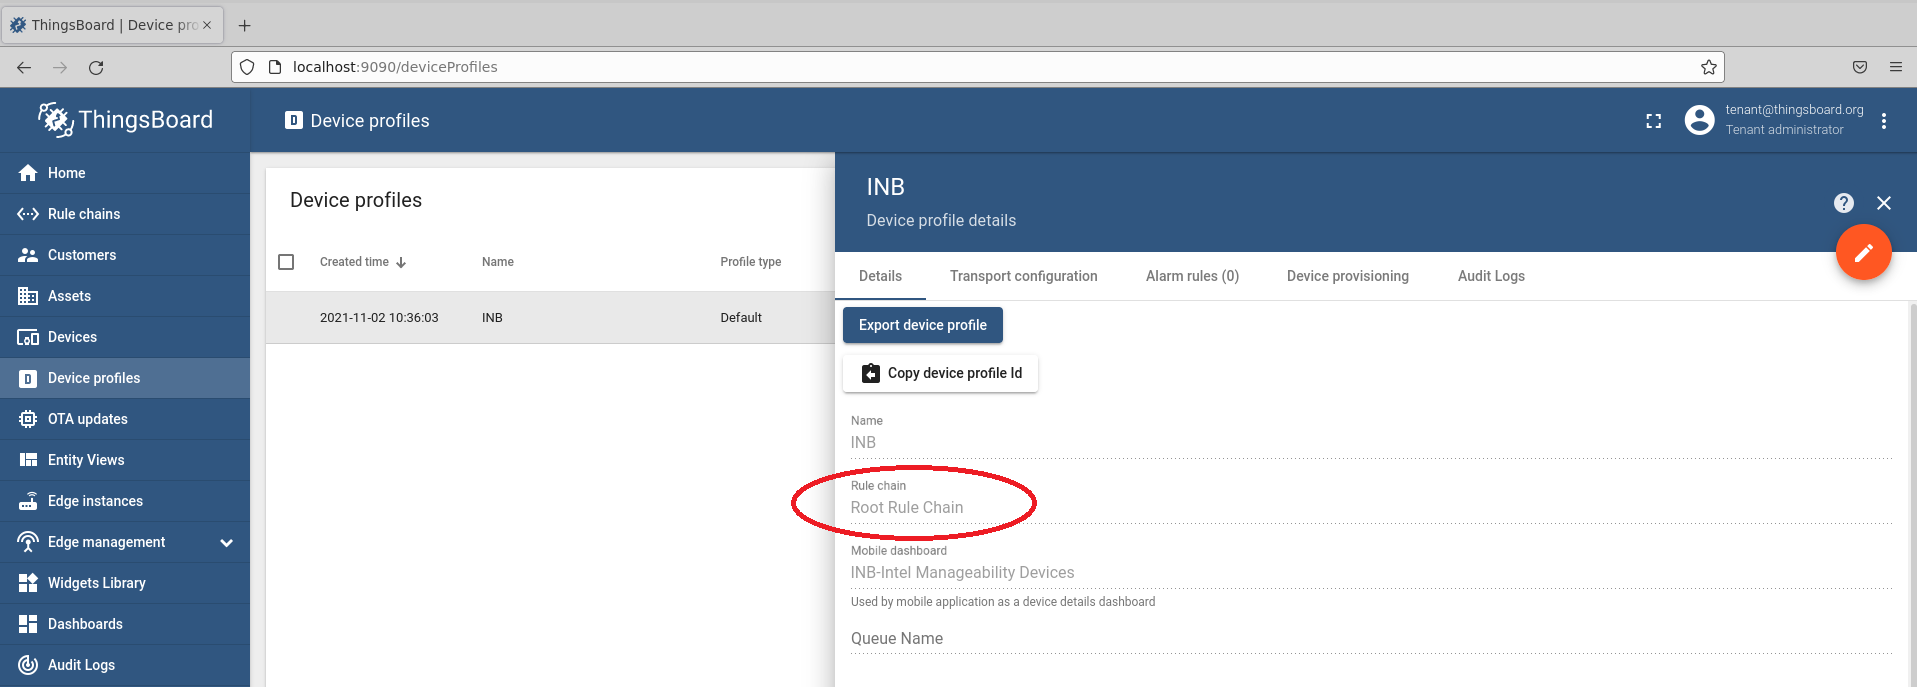
Check the pre-configured device profile from Intel named: INB.
The Root Rule Chain is associated with the pre-defined Device Profile “INB.”
Definitions in this Root Rule Chain determine how incoming and outgoing messages are processed for all devices registered in this profile.
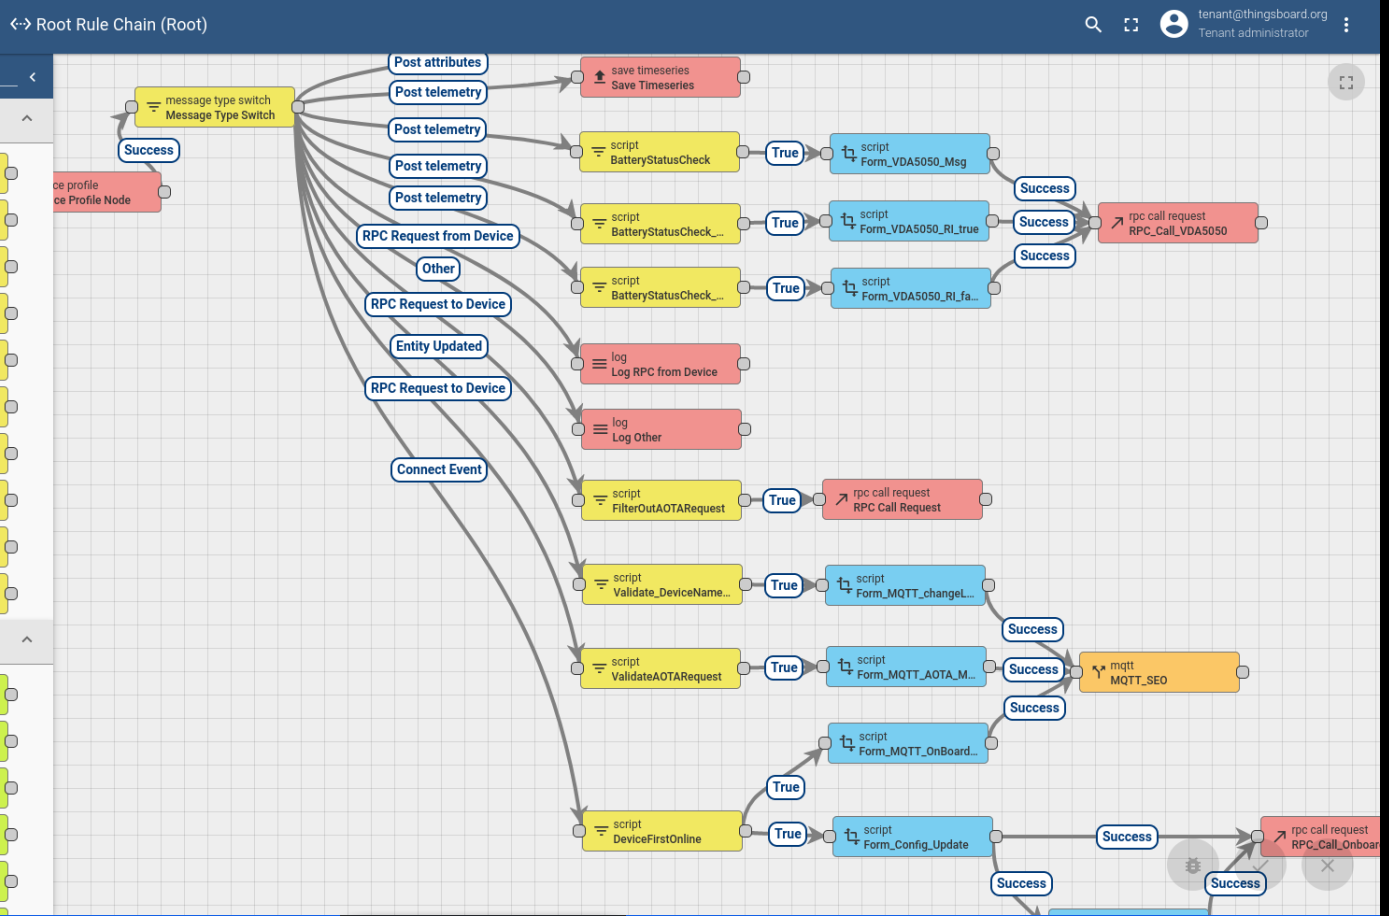
Check the pre-configured Root Rule Chain from ThingsBoard*.
Open the Rule:

Intel added to the Rule Chain to fulfill the following use cases:
Basic fleet management
Remote inference
Onboarding
OTA update
Note
To add new clients to the fleet management server, see Troubleshooting for Robot Orchestration Tutorials, “Add New Clients to the Fleet Management Server”.
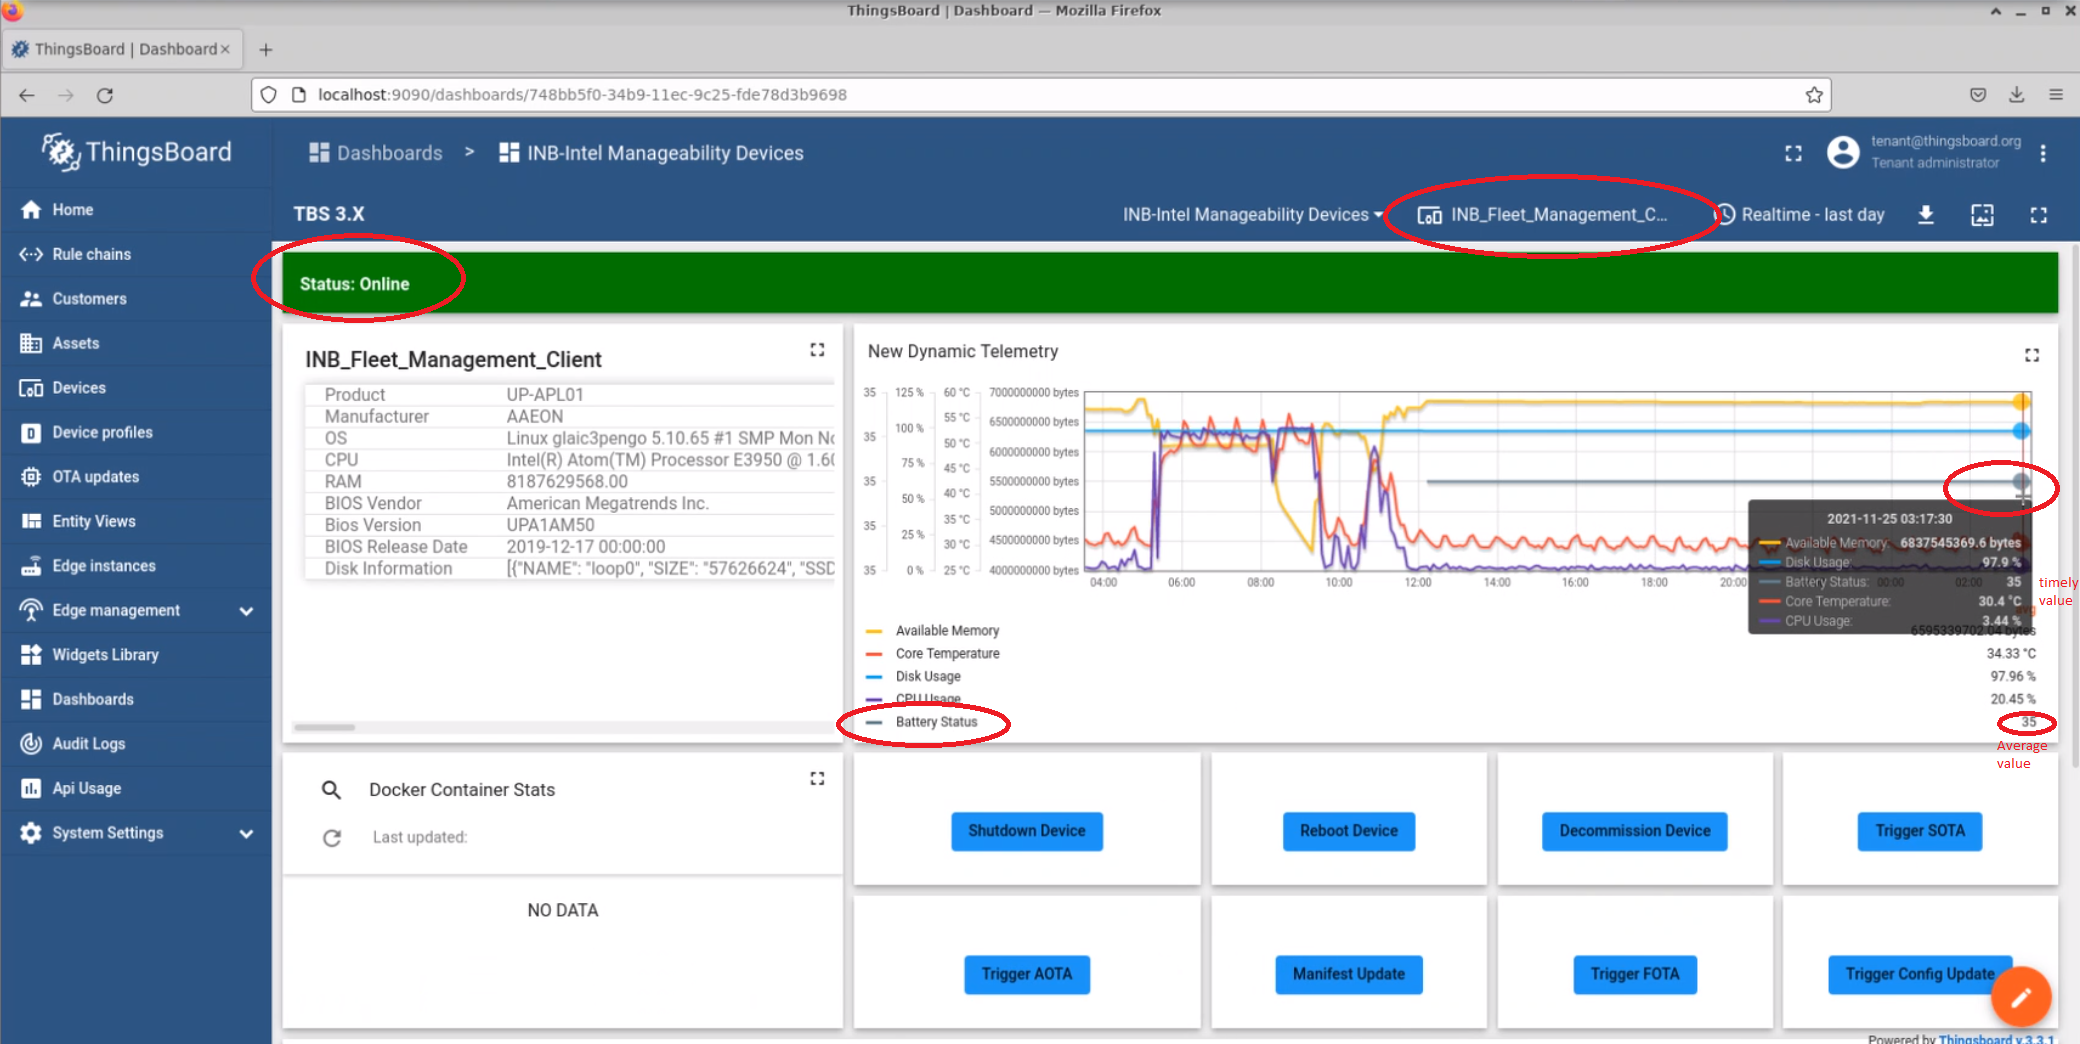
Check out the dashboard tailored for Intel® In-Band Manageability.
Open the dashboard:
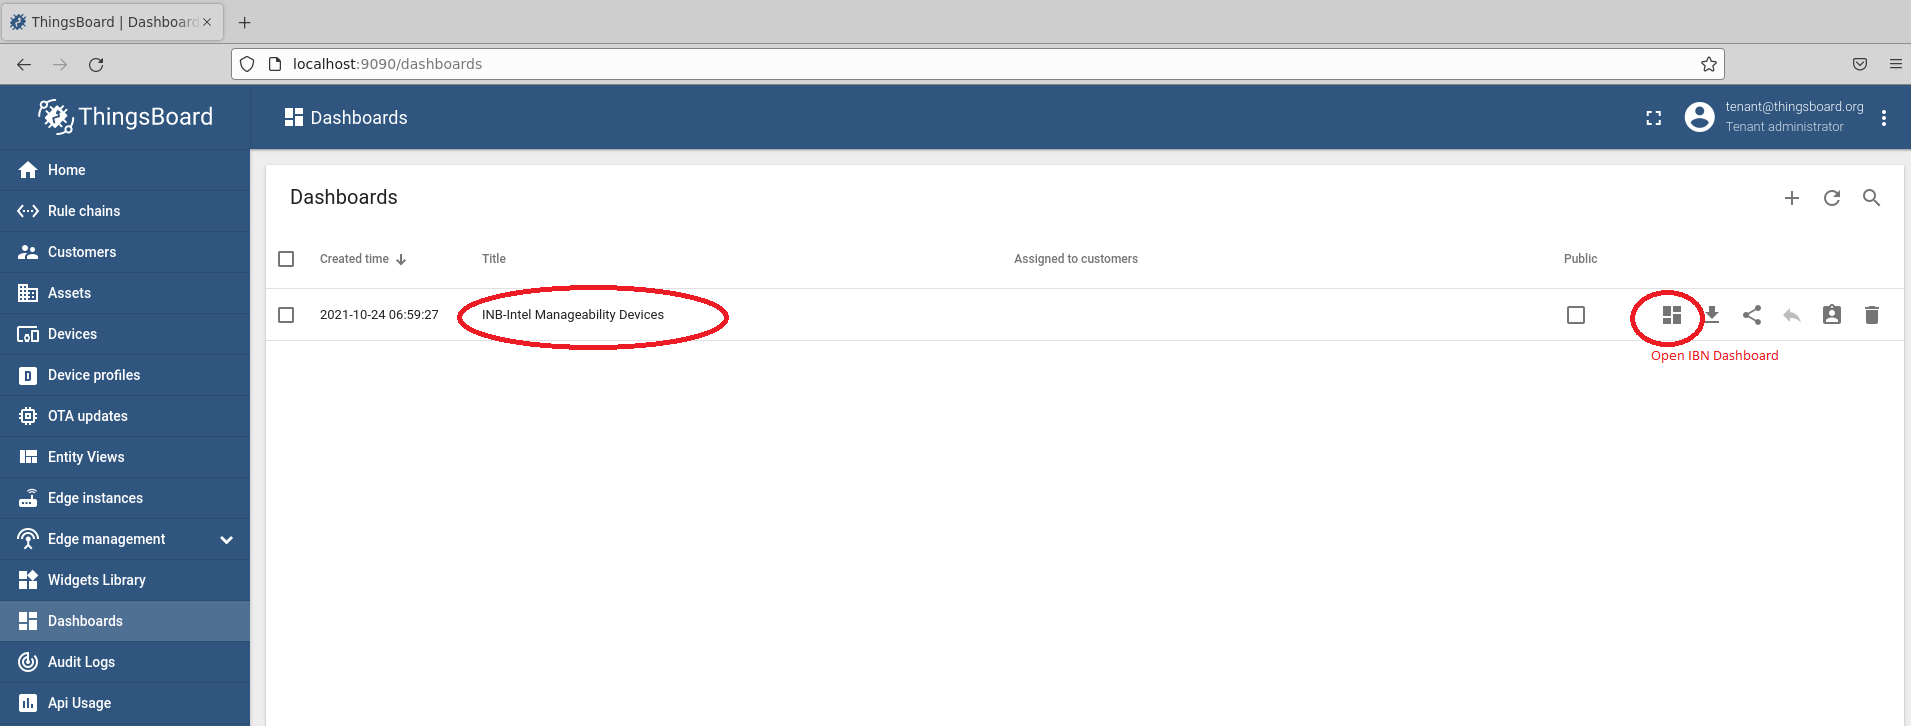
The dashboard shows the device’s basic information and telemetry data, for example:
The INB_Fleet_Management_Client device is currently online (if a device is onboarded through the onboarding process, an additional device is shown to be online.).
The battery status is numeric and presented as an average value.
The battery level is 35 (hover over the grey line representing battery value by time to see this).
Check the Wandering application logs when the battery level goes under 40%.
The logs are similar to this:
[wandering_mapper]: GoToLocation 0,0