OpenVINO™ Tutorial on Multi-camera Object Detection using Intel® RealSense™ Depth Camera D457
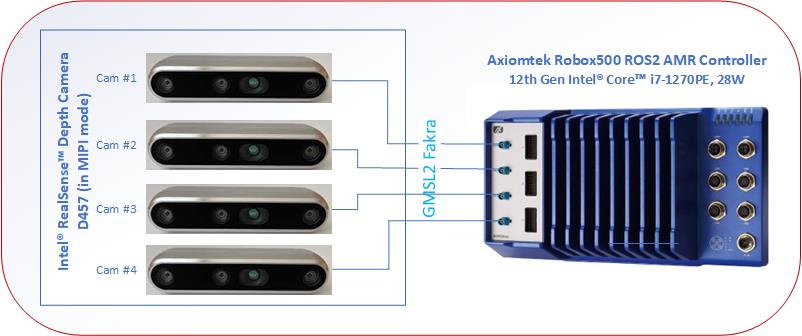
In this tutorial, the multi-camera use case is demonstrated using an Axiomtek Robox500 ROS2 AMR Controller and four Intel® RealSense™ Depth Camera D457. Here, the four cameras are connected to the Industrial Gigabit Multimedia Serial Link™ (GMSL) supported Axiomtek Robox500 ROS2 AMR Controller through GMSL/FAKRA (female-to-female) cables, which provide high-bandwidth video transmission.
Four instances of AI-based applications for object detection and object segmentation are run in parallel using four Intel® RealSense™ camera streams. Further in this tutorial, the Ultralytics YOLOv8 model is downloaded and used for object detection and object segmentation. The tutorial can be run on an Axiomtek Robox500 ROS2 AMR Controller consisting of either a 12th Gen Intel® Core™ i7-1270PE processor or a 13th Gen Intel® Core™ i7-1370PE processor, both with 28W TDP and an Intel® Iris® Xe Integrated Graphics Processing Unit.
The setup looks like as described in the table below.
Camera |
AI model |
AI Workload |
Device |
|---|---|---|---|
Camera-1 |
YOLOv8n-seg:FP16 |
Object detection & segmentation |
GPU |
Camera-2 |
YOLOv8n-seg:FP16 |
Object detection & segmentation |
CPU |
Camera-3 |
YOLOv8n:FP16 |
Object detection |
GPU |
Camera-4 |
YOLOv8n-seg:FP16 |
Object detection & segmentation |
GPU |
The following steps are required in order to setup the Axiomtek Robox500 ROS2 AMR Controller to support four Intel® RealSense™ Depth Camera D457.
Axiomtek Robox500 ROS2 AMR Controller Setup
Connect four Intel® RealSense™ Depth Camera D457 to the Axiomtek Robox500 ROS2 AMR Controller as shown in the below picture. Now, power-on the target.
Note
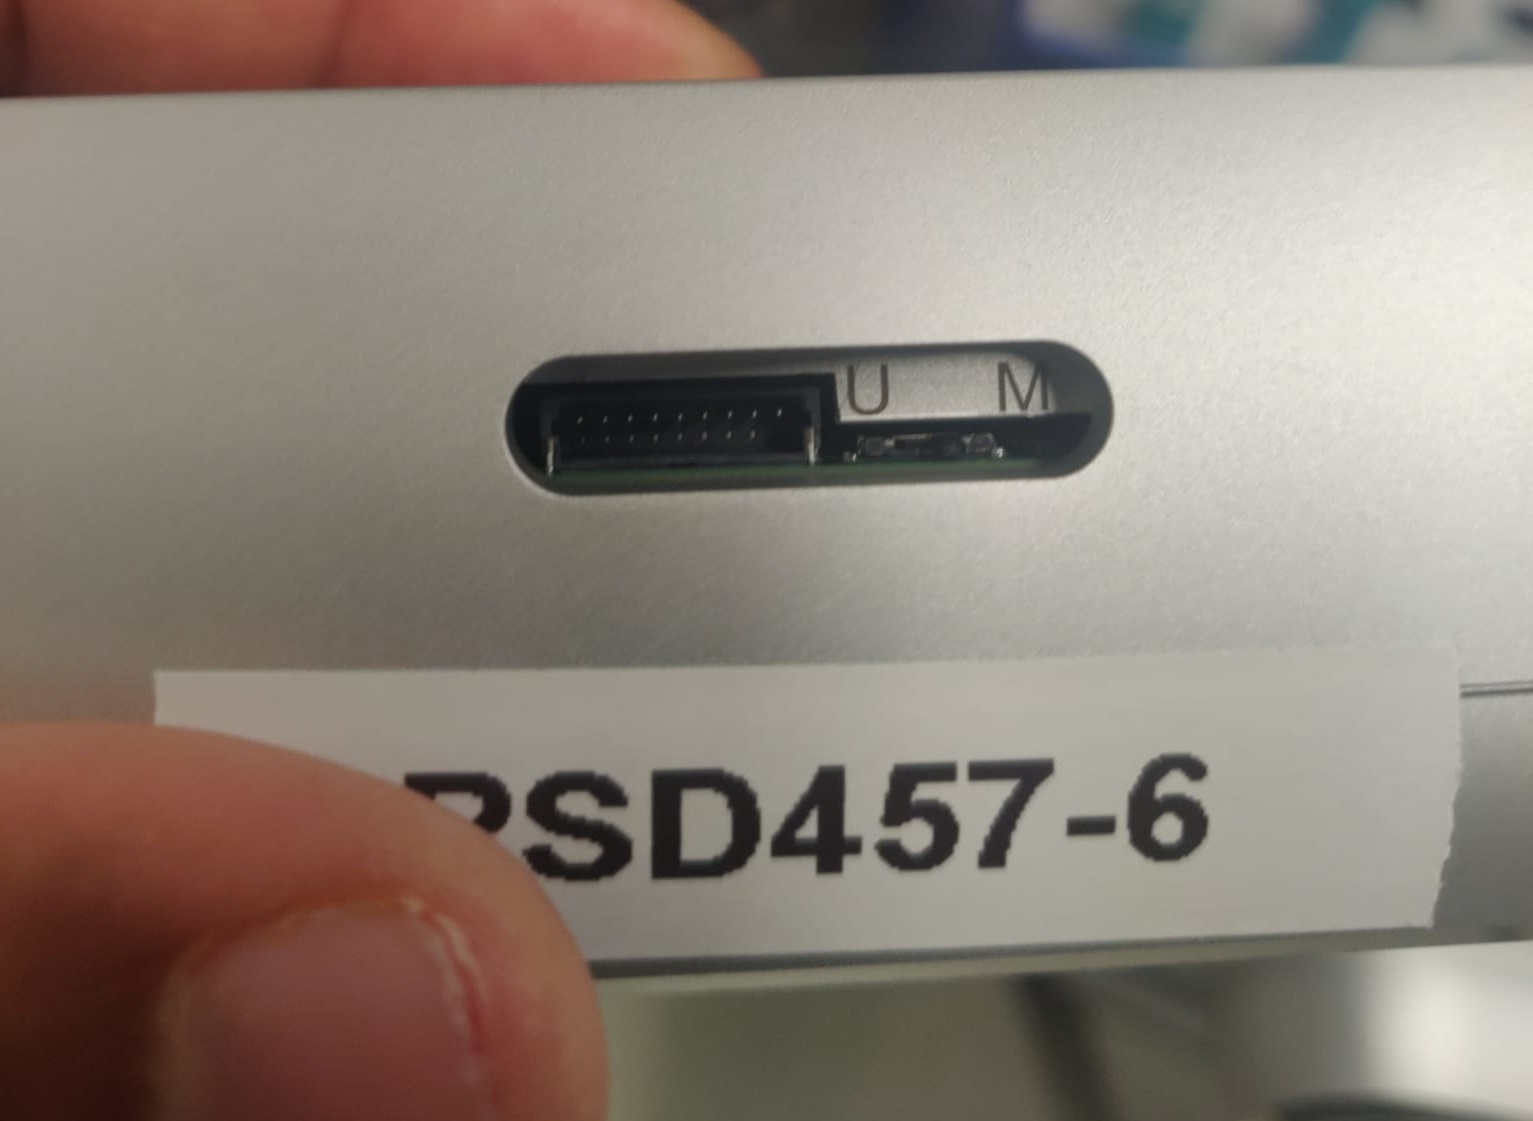
Select the “MIPI” mode of the Intel® RealSense™ Depth Camera D457 by moving the select switch on the camera to “M”, as shown in the picture below.
Install GPU driver
From the setup description explained above, three out of the four instances of the AI-based applications are run on a GPU. Therefore, the appropriate GPU drivers need to be installed.
Run the below command to check for the GPU device.
# Install clinfo
sudo apt install -y clinfo

# Run clinfo command to check GPU Device
$ clinfo | grep -i "Device Name"
  Device Name                                     Intel(R) UHD Graphics
  Device Name                                     13th Gen Intel(R) Core(TM) i7-1370PE
    Device Name                                   Intel(R) UHD Graphics
    Device Name                                   Intel(R) UHD Graphics
    Device Name                                   Intel(R) UHD Graphics

If no GPU device is listed, then the GPU driver is not installed.
Note
If the above GPU driver is not installed, then follow the steps described in the documentation Enable Intel® Level Zero and OpenCL™ Graphics Compute Runtime (excluding the step#2 to install the linux-intel-rt, which is not required for this tutorial) to install the same.
Verify that the GPU driver is installed using the previous clinfo command.
Install librealsense2 and realsense2 tools
sudo apt install -y ros-humble-librealsense2-tools
Configure the Intel® GMSL Serializer-Deserializer ACPI devices and install intel-ipu6-dkms Dynamic Kernel Module Support package
The following steps describe how to configure the Intel® GMSL Serializer-Deserializer ACPI devices and further to install and load the intel-ipu6-dkms Dynamic Kernel Module Support package.
The design approach of the GMSL Add-in-Card present in the Axiomtek Robox500 ROS2 AMR Controller is called
Standalone-mode. i.e., a single GMSL Serializer and Camera Sensor device is connected per Deserializer. In order to configure the Intel® GMSL Serializer-Deserializer ACPI devices inStandalone-mode, follow the steps described in the documentation Configure Intel® GMSL SerDes ACPI devices.To download and install the
intel-ipu6-dkmsDynamic Kernel Module Support package, follow the steps described in the documentation Intel® GMSL intel-ipu6 Debian kernel modules (DKMS).To load the
intel-ipu6kernel modules after installation and to enable the Intel® RealSense™ Depth Camera D457, follow the steps described in the documentation Enable ROS2 Intel® RealSense™ Depth Camera D457 GMSL.
Note
The steps, such as BIOS settings and d4xx module user parameters, must be configured to be relevant to the Standalone-mode of the Add-in-Card for Axiomtek Robox500 ROS2 AMR Controller.
Install and run multi-camera object detection tutorial using the Intel® RealSense™ Depth Camera D457
Install
Install the multi-camera object detection tutorial by using the following command.
sudo apt install -y ros-humble-pyrealsense2-ai-demo
Note
The ros-humble-pyrealsense2-ai-demo installation will also do the following:
installs all the run-time python dependency packages,
downloads Ultralytics YOLOv8 model files and generate the models.
The installation will run for 25-30 minutes and consumes approximately 2GB of the disk space.
Run the tutorial
Run the below commands to start the tutorial.
# Activate the pyrealsense2-ai-demo python environment
. /opt/ros/humble/share/pyrealsense2-ai-demo/venv/bin/activate

# Source the ros2 humble
source /opt/ros/humble/setup.bash

# Run the pyrealsense2-ai-demo tutorial for four camera input streams
python3 /opt/ros/humble/bin/pyrealsense2_ai_demo_launcher.py --config=/opt/ros/humble/share/pyrealsense2-ai-demo/config/config_ros2_v4l2_rs-color-0_3.js
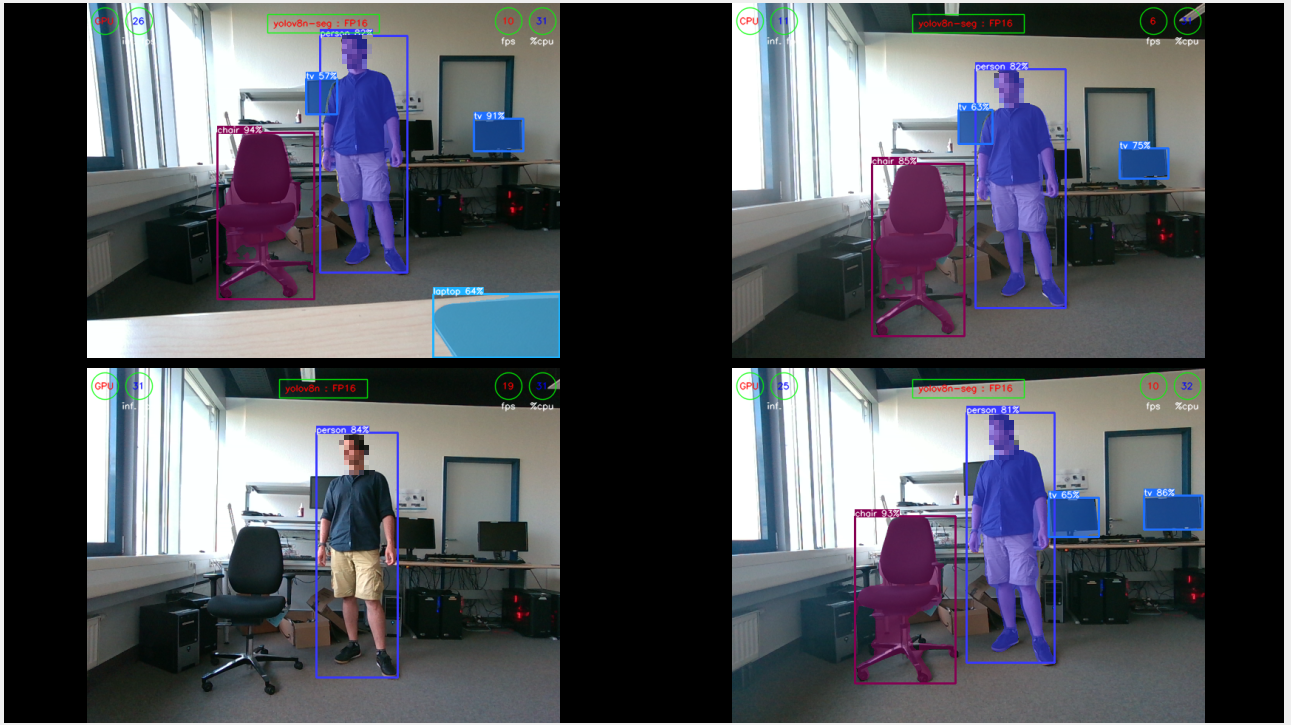
All the four cameras are started after approximately 15-20 secs, as shown in the below picture.
Note
The different config files can be used to select the number of cameras from a minimum of one camera to a maximum of four cameras.
config_ros2_v4l2_rs-color-0.jsconfig file to run the tutorial with one cameraconfig_ros2_v4l2_rs-color-0_1.jsconfig file to run the tutorial with two camerasconfig_ros2_v4l2_rs-color-0_2.jsconfig file to run the tutorial with three camerasconfig_ros2_v4l2_rs-color-0_3.jsconfig file to run the tutorial with four cameras
Troubleshooting and workarounds
GPU driver not found even after the GPU driver is installed.
$ sudo intel_gpu_top
intel_gpu_top: ../tools/intel_gpu_top.c:1909: init_engine_classes: Assertion `max >=0' failed.
Aborted
Solution: The issue is resolved by creating the following symbolic link.
sudo ln -s /lib/firmware/i915/adlp_guc_70.1.1.bin /lib/firmware/i915/adlp_guc_70.0.3.bin
Stability issue or GPU hang error. GPU Hang error is observed in the
dmesgand the application hangs when run for more than 10-15 minutes with three or more instances of AI workload is offloaded to GPU.[ 1228.692171] perf: interrupt took too long (3136 > 3126), lowering kernel.perf_event_max_sample_rate to 63750 [ 1675.286683] perf: interrupt took too long (3924 > 3920), lowering kernel.perf_event_max_sample_rate to 50750 [ 1828.865938] Asynchronous wait on fence 0000:00:02.0:gnome-shell[991]:2c6c0 timed out (hint:intel_atomic_commit_ready [i915]) [ 1831.944273] i915 0000:00:02.0: [drm] GPU HANG: ecode 12:1:8ed9fff2, in python3 [6414] [ 1831.944340] i915 0000:00:02.0: [drm] Resetting chip for stopped heartbeat on rcs0 [ 1831.944474] i915 0000:00:02.0: [drm] python3[6414] context reset due to GPU hang [ 1831.944563] i915 0000:00:02.0: [drm] GuC firmware i915/adlp_guc_70.0.3.bin version 70.1 [ 1831.944565] i915 0000:00:02.0: [drm] HuC firmware i915/tgl_huc_7.9.3.bin version 7.9 [ 1831.961857] i915 0000:00:02.0: [drm] HuC authenticated [ 1831.962252] i915 0000:00:02.0: [drm] GuC submission enabled [ 1831.962254] i915 0000:00:02.0: [drm] GuC SLPC enabled
Solution: The issue is resolved by adding the following kernel commandline argument into the grub file. This will disable the dynamic power management of the GPU.
# Add the following into the /etc/default/grub file
GRUB_CMDLINE_LINUX="i915.enable_dc=0"

# Save the file and update the grub
sudo update-grub

# Reboot the system.