Install the Intel® Robotics SDK on the Jackal™ Onboard Computer
This chapter describes how to install the Intel® Robotics SDK together with the ROS 2 middleware and the Clearpath Robotics ecosystem on the onboard computer of the Jackal™ robot.
The Clearpath Robotics Jackal™ robot is equipped with an onboard computer that has a pre-installed Ubuntu* 22.04 LTS operating system, ROS 2 Humble, and the Clearpath Robotics software packages. We recommend that you use the pre-installed software for the initial bring-up of your Jackal™ robot. During the initial bring-up, you should also update the firmware of the MCU, as described on the Robot Installation page of the Clearpath Robotics documentation.
We recommend that you create a backup of the default software installation or replace the pre-installed SATA M.2 SSD with an empty storage device, before you continue with the next steps.
Install ROS 2 Humble and the Intel® Robotics SDK
To install ROS 2 Humble and the Intel® Robotics SDK on the Clearpath Robotics Jackal™ robot, follow the instructions in the Getting Started Guide of the Intel® Robotics SDK.
Since the Clearpath Robotics services will need an account with the
username administrator, you can create this account during the
installation of the Ubuntu* operating system. Otherwise, you can create this
account and set its group membership by means of:
sudo adduser administrator
sudo usermod -a -G sudo administrator

Install the Clearpath Robotics Software Packages
After you have installed ROS 2 Humble and the Intel® Robotics SDK, you also need the ROS 2 development tools (compilers and other tools to build ROS 2 packages). They can be installed as described by the official ROS 2 Installation Instructions:
sudo apt-get install ros-dev-tools
Now you can install the Clearpath Robotics software packages as described in the Package Install section of the Clearpath Robotics documentation. Clearpath Robotics offers two alternative ways to install the software:
Option 1: Install Script uses an automated installer.
Option 2: Manual Source Install provides detailed instructions on how to install the software with higher flexibility.
Use one of these procedures to install the software on the Jackal™ onboard computer.
Create Your Robot Configuration
This section describes how you can create the robot.yaml configuration
file for your Jackal™ robot with an Intel® RealSense™ D435i camera. Make sure
that you have completed the steps described in the previous section,
Install the Clearpath Robotics Software Packages.
Identify the Serial Number of your Intel® RealSense™ Camera
The serial number of the Intel® RealSense™ camera has to be included in the
robot.yaml file. To identify the serial number, connect the camera
to the onboard computer of the Jackal™ robot and run this command:
ros2 launch realsense2_camera rs_launch.py
The output of this command will print the serial number. The serial
number of the camera in the example below is 207522xxxx38 (some digits
are masked here to preserve confidentiality).
[realsense2_camera_node-1] [INFO] [1709051840.999128954] [camera.camera]: RealSense ROS v4.54.1
[realsense2_camera_node-1] [INFO] [1709051840.999193090] [camera.camera]: Built with LibRealSense v2.55.0
[realsense2_camera_node-1] [INFO] [1709051840.999200850] [camera.camera]: Running with LibRealSense v2.55.0
[realsense2_camera_node-1] [INFO] [1709051841.005234011] [camera.camera]: Device with serial number 207522xxxx38 was found.
Now you can stop the command by pressing Ctrl-c.
Note
Don’t use the command lsusb -v to identify the serial number. The
number displayed by this command might differ from the true serial number.
Create your Robot YAML File
To create the robot.yaml file with the configuration of your
Jackal™ robot, follow the instructions on the
Robot YAML Overview
page of the Clearpath Robotics documentation. As a starting point, you
can use the example configuration
j100_sample.yaml
in the Clearpath Robotics
configuration repository.
Open this yaml file with an editor and adapt the sections serial_number
and system according to your needs.
Change the
serial_numberaccording to the serial number of your robot, for examplej100-1234.In the
system/hostssection, adapt thehostnameaccording to the hostname of the onboard computer of your Jackal™ robot.In the
system/hostssection, adapt theipvalue according to the IP address of your Jackal™ robot – either its static address or the dynamic address that is assigned by the router of your network.In the
system/ros2section, adapt thenamespacestring. While the Clearpath Robotics default configuration usually defines a namespace for the ROS 2 topics, we recommend to use an empty namespace, as it is used by the tutorials of the Intel® Robotics SDK. An empty namespace is indicated by a slash character:namespace: /In the
system/ros2section, add thedomain_identry and set it to a value that does not conflict with theROS_DOMAIN_IDof other ROS 2 installations in your neighborhood. The value that you use here will be propagated into the/etc/clearpath/setup.bashscript, whose execution has been added to your~/.basrcscript when you executed one of the installation options in section Install the Clearpath Robotics Software Packages. In consequence, yourROS_DOMAIN_IDenvironment variable will be set to the value that you define here.If you have used the manual installation option in section Install the Clearpath Robotics Software Packages, add the
workspacesentry to thesystem/ros2section. This entry provides a list of setup scripts that need to be sourced. Provide the path to thesetup.bashscript of the workspace that was created when you executed the steps in Option 2: Manual Source Install, section “Source Install”. The path of this script is/home/administrator/clearpath_ws/install/setup.bash
Details on these configuration entries are provided on the
System
page of the Clearpath Robotics documentation. To provide an example,
the following listing shows the first sections of a robot.yaml file.
serial_number: j100-1234
version: 0
system:
  hosts:
    - hostname: jackal-cfls-01
      ip: 192.168.1.78
  ros2:
    namespace: /
    domain_id: 68
    workspaces:
      - /home/administrator/clearpath_ws/install/setup.bash
platform:
  ...
After you have completed the configuration, copy the robot.yaml file
to the /etc/clearpath/ folder on the onboard computer of your
Jackal™ robot.
If your ~/.bashrc script defines a ROS_DOMAIN_ID environment variable,
you have to remove this definition. As mentioned above, this variable will be
set by the /etc/clearpath/setup.bash script according to the domain_id
value that you have defined in the robot.yaml file.
After you have installed the Clearpath Robotics software packages and
configured your robot.yaml file, you can run the commands
ros2 node list and ros2 topic list in order to verify that
the Clearpath Robotics services have started the Jackal™-specific ROS 2
nodes, so that the related ROS 2 topics are published.
Add your Intel® RealSense™ D435i Camera to the Robot YAML File
The robot configuration file, which you have created in the previous section,
still requires to define a camera in the sensors section.
The Sensors/Cameras
page of the Clearpath Robotics documentation shows an example of the
data structure that defines an Intel® RealSense™ camera instance. We propose to
add the following camera configuration as the first device in the
sensors section. This configuration has been tested successfully with
the Intel® Robotics SDK:
sensors:
  camera:
  - model: intel_realsense
    urdf_enabled: true
    launch_enabled: true
    parent: base_link
    xyz: [0.21, 0.0, 0.19]
    rpy: [0.0, 0.0, 0.0]
    ros_parameters:
      camera:
        camera_name: camera_0
        device_type: d435i
        serial_no: "207522xxxx38"
        enable_color: true
        rgb_camera.profile: 640,480,30
        enable_depth: true
        depth_module.profile: 640,480,30
        pointcloud.enable: true
        enable_infra1: true
        align_depth.enable: true
        enable_sync: true
        initial_reset: true
In comparison to the example data structure in the Clearpath Robotics documentation, the following items have been adapted:
The
xyzposition of thecamerajoint relative to thebase_linkhas been set to[0.21, 0.0, 0.19]. This means that the camera sits above the front fender of the Jackal™ robot as shown in the image below.The
device_typehas been set tod435i.The
serial_nohas been replaced with the actual serial number of the camera, which can be identified as described in the Identify the Serial Number of your Intel® RealSense™ Camera section.The following features have been enabled:
enable_infra1,align_depth.enable,enable_sync, andinitial_reset.
Copy the robot.yaml file to the /etc/clearpath/ folder on the onboard computer
of your Jackal™ robot.
Reboot the robot, so that the new configuration will be propagated.
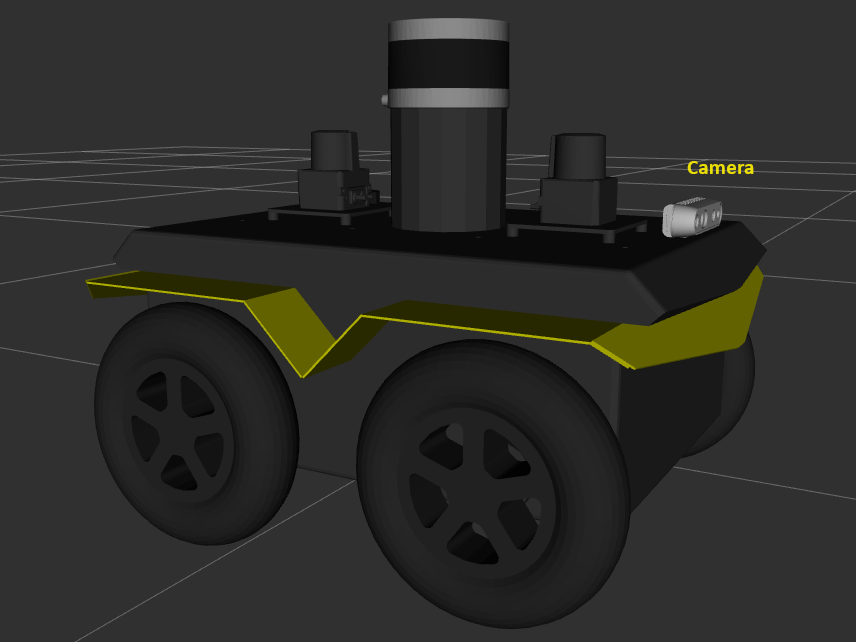
Jackal™ robot with an Intel® RealSense™ camera above the front fender. The image has been rendered by the rviz2 tool using the TF data published by the Clearpath Robotics services running on the robot.
Verify the Robot Configuration
Verify the Frames of the TF2 Tree
If not already installed, use the following command to install the ROS2 TF2 Tools:
sudo apt install ros-humble-tf2-tools
To verify that the robot state publisher communicates the correct TF2 tree, run the following command:
ros2 run tf2_tools view_frames
This command will listen to the frames that are being broadcast over the ROS 2
middleware and generate a PDF file showing how the frames of the robot are connected.
Open the PDF file and verify that the TF2 tree contains the camera_0_link
and its children as shown in the images below.
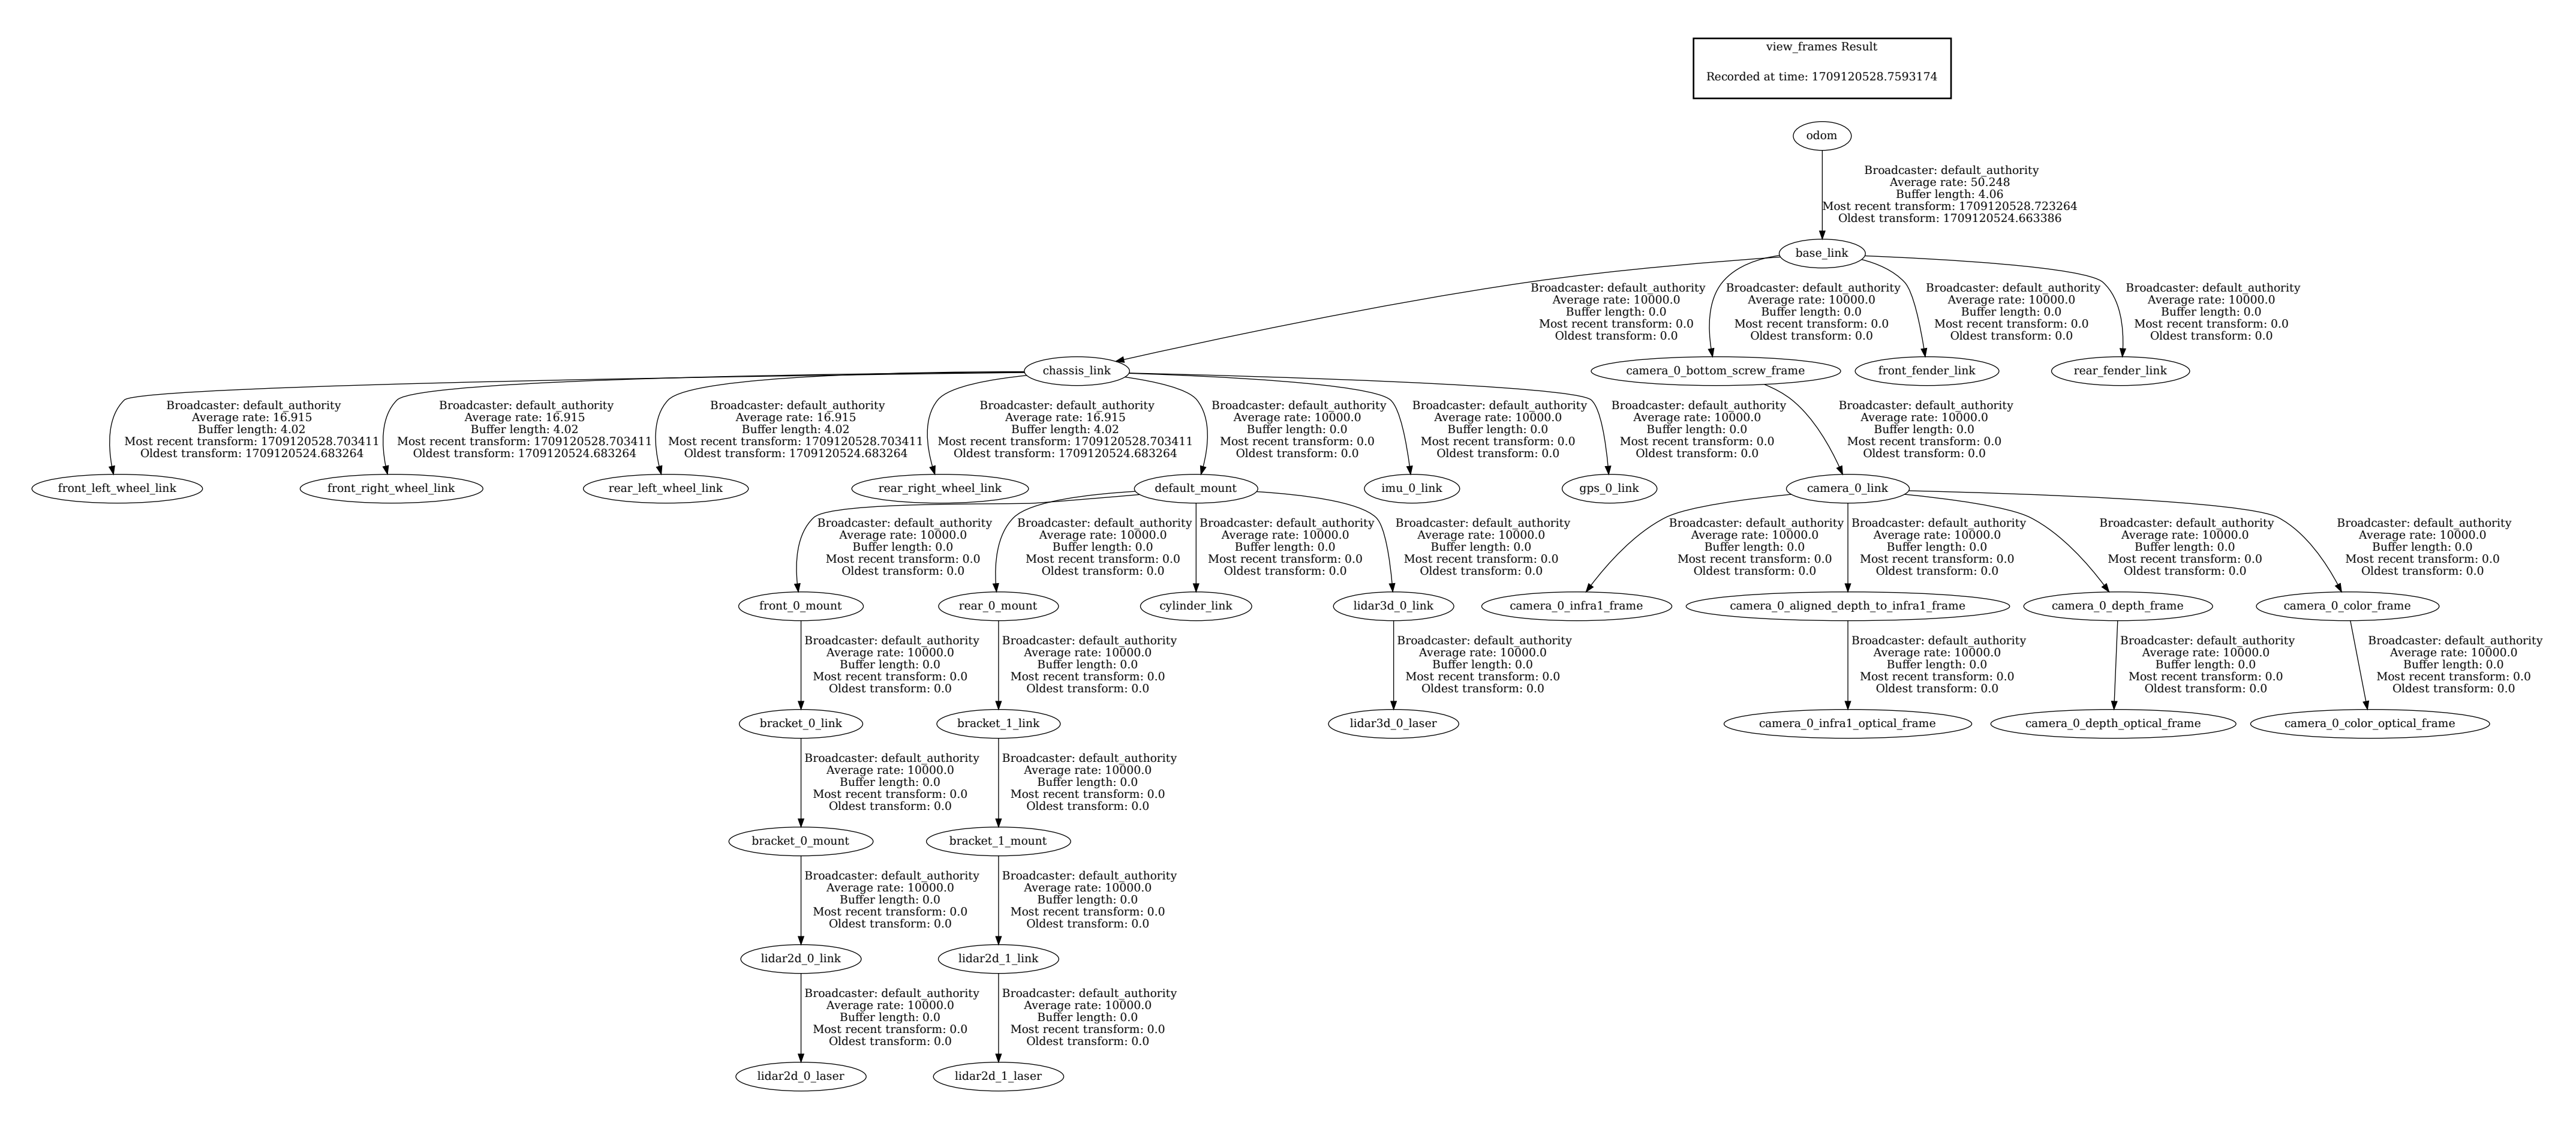
Complete TF2 tree of the Jackal™ robot with Intel® RealSense™ camera; to increase the figure, right-click on the image and open the image in a new browser tab
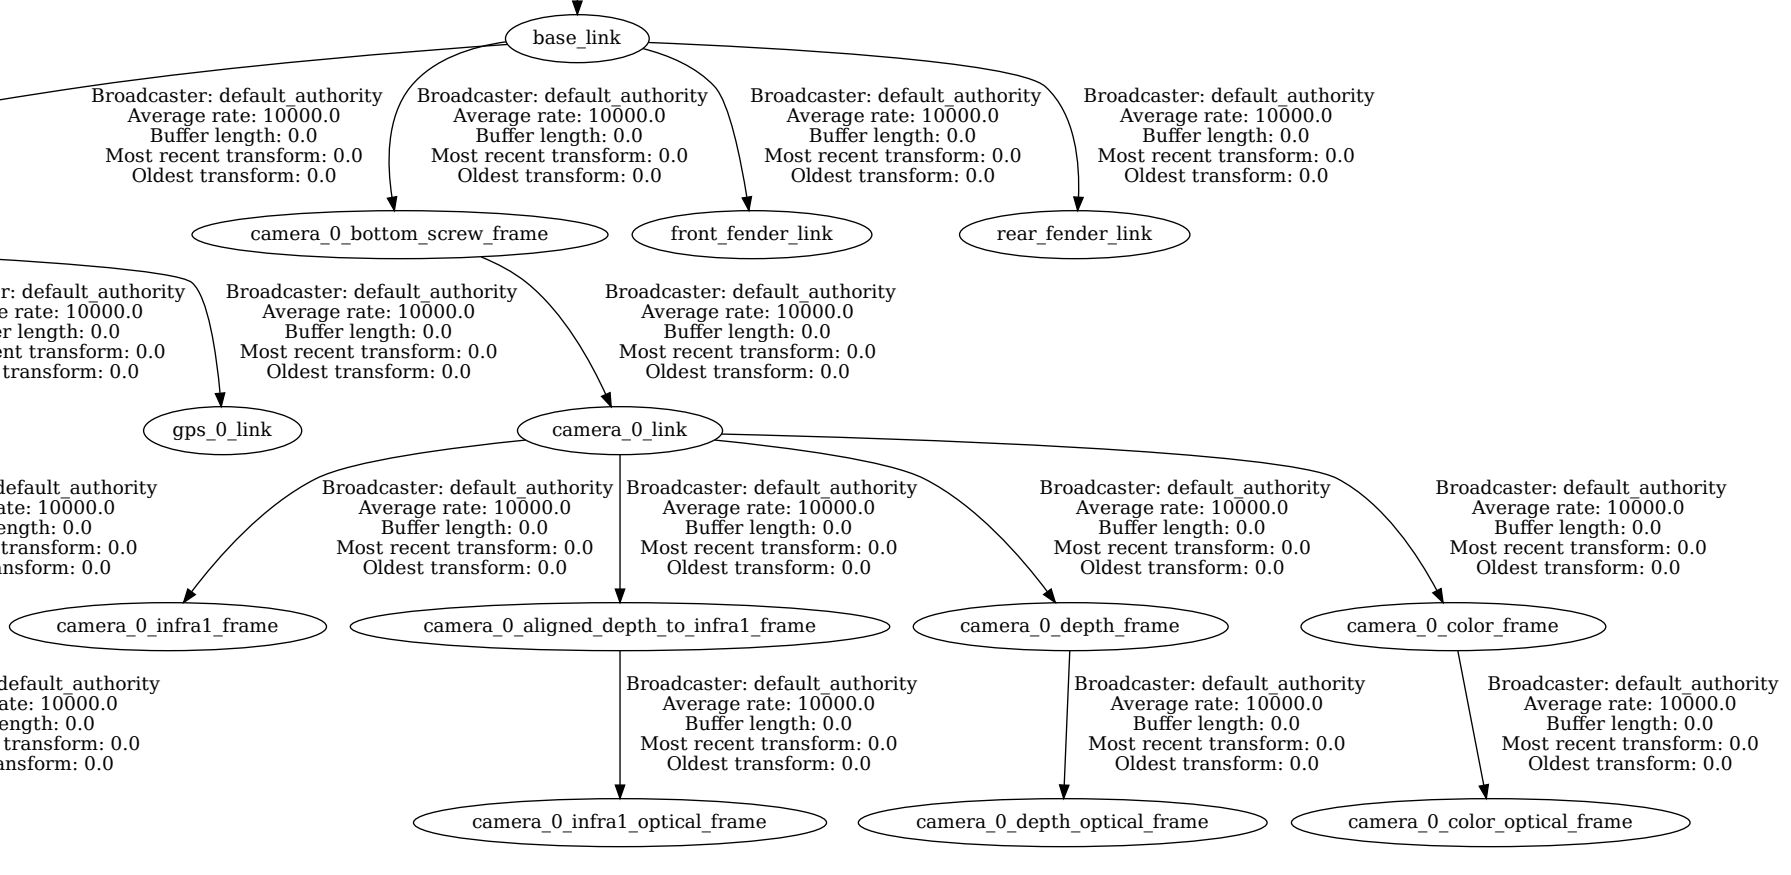
TF2 tree of the Jackal™ robot – detailed view on the camera_0_link
Verify the ROS 2 Topics
Execute the command
ros2 topic list
and verify that the required ROS 2 topics are published:
/cmd_vel
/diagnostics
/diagnostics_agg
/diagnostics_toplevel_state
/joint_state_broadcaster/transition_event
/joy_teleop/cmd_vel
/joy_teleop/joy
/joy_teleop/joy/set_feedback
/parameter_events
/platform/bms/state
/platform/cmd_vel_unstamped
/platform/dynamic_joint_states
/platform/emergency_stop
/platform/joint_states
/platform/mcu/status
/platform/mcu/status/power
/platform/mcu/status/stop
/platform/motors/cmd_drive
/platform/motors/feedback
/platform/odom
/platform/odom/filtered
/platform/wifi_connected
/platform/wifi_status
/platform_velocity_controller/transition_event
/rc_teleop/cmd_vel
/robot_description
/rosout
/sensors/camera_0/camera/aligned_depth_to_color/camera_info
/sensors/camera_0/camera/aligned_depth_to_color/image_raw
/sensors/camera_0/camera/aligned_depth_to_color/image_raw/compressed
/sensors/camera_0/camera/aligned_depth_to_color/image_raw/compressedDepth
/sensors/camera_0/camera/aligned_depth_to_color/image_raw/theora
/sensors/camera_0/camera/aligned_depth_to_infra1/camera_info
/sensors/camera_0/camera/aligned_depth_to_infra1/image_raw
/sensors/camera_0/camera/aligned_depth_to_infra1/image_raw/compressed
/sensors/camera_0/camera/aligned_depth_to_infra1/image_raw/compressedDepth
/sensors/camera_0/camera/aligned_depth_to_infra1/image_raw/theora
/sensors/camera_0/camera/color/camera_info
/sensors/camera_0/camera/color/image_raw
/sensors/camera_0/camera/color/image_raw/compressed
/sensors/camera_0/camera/color/image_raw/compressedDepth
/sensors/camera_0/camera/color/image_raw/theora
/sensors/camera_0/camera/color/metadata
/sensors/camera_0/camera/depth/camera_info
/sensors/camera_0/camera/depth/color/points
/sensors/camera_0/camera/depth/image_rect_raw
/sensors/camera_0/camera/depth/image_rect_raw/compressed
/sensors/camera_0/camera/depth/image_rect_raw/compressedDepth
/sensors/camera_0/camera/depth/image_rect_raw/theora
/sensors/camera_0/camera/depth/metadata
/sensors/camera_0/camera/extrinsics/depth_to_color
/sensors/camera_0/camera/extrinsics/depth_to_infra1
/sensors/camera_0/camera/infra1/camera_info
/sensors/camera_0/camera/infra1/image_rect_raw
/sensors/camera_0/camera/infra1/image_rect_raw/compressed
/sensors/camera_0/camera/infra1/image_rect_raw/compressedDepth
/sensors/camera_0/camera/infra1/image_rect_raw/theora
/sensors/camera_0/camera/infra1/metadata
/sensors/camera_0/color/image
/sensors/camera_0/depth/image
/sensors/camera_0/points
/sensors/gps_0/nmea_sentence
/sensors/imu_0/data
/sensors/imu_0/data_raw
/sensors/imu_0/magnetic_field
/sensors/lidar2d_0/diagnostics
/sensors/lidar2d_0/laser_status
/sensors/lidar2d_0/scan
/sensors/lidar2d_1/diagnostics
/sensors/lidar2d_1/laser_status
/sensors/lidar2d_1/scan
/sensors/lidar3d_0/diagnostics
/sensors/lidar3d_0/points
/sensors/lidar3d_0/scan
/sensors/lidar3d_0/velodyne_packets
/sensors/lidar3d_0/velodyne_points
/set_pose
/tf
/tf_static
/twist_marker_server/cmd_vel
/twist_marker_server/feedback
/twist_marker_server/update
The names of the camera-related topics depend on the version of the
ros-humble-realsense2-camera package on your system. The list above
has been created on a system with version 4.55 of this package.
To identify the installed package version on your board, run the command:
apt show ros-humble-realsense2-camera
The following table shows how the names of the camera-related topics depend on the package version.
Version of
|
Camera-related topics start with |
|---|---|
4.55 |
|
4.54 |
|
Jackal™ Troubleshooting
If the output of the ros2 topic list command does not show any topics,
verify that you are logged in as the administrator user. Furthermore,
check that the ROS_DOMAIN_ID environment variable contains the value
that is defined in your /etc/clearpath/robot.yaml file
under the system/ros2/domain_id entry.
If the output of the ros2 topic list command shows that there are some
ROS 2 topics missing (see the Verify the ROS 2 Topics section for a list of topics),
there might be an issue with your installation of the Clearpath Robotics
services. In this case, you can check whether the required services are
up and running. These services are responsible for parsing the robot.yaml
file and for staring the required ROS 2 nodes.
sudo systemctl status clearpath-platform.service clearpath-sensors.service clearpath-robot.service
If any of these services are not active (running), you can check whether the systemd journal shows any error messages:
sudo journalctl -b | grep clearpath