Step 7: Device Onboarding Control Plane Setup#
These steps are used to configure ThingsBoard* for device onboarding. Do all steps on the control plane.
Install the MQTT Service#
Make sure that the common name is the hostname of control plane.
Install the Eclipse Mosquitto* broker and client for device onboarding and application over-the-air (AOTA) message queuing telemetry transport (MQTT) messages:
sudo apt-add-repository ppa:mosquitto-dev/mosquitto-ppa
sudo apt-get update
sudo apt-get install mosquitto
sudo apt-get install mosquitto-clients
sudo apt clean
Generate the certificates for the Mosquitto secure sockets layer (SSL) and the
server.keyfor the Mosquitto SSL:cd /etc/mosquitto/certs openssl genrsa -des3 -out ca.key 2048 openssl req -new -x509 -days 1826 -key ca.key -out ca.crt openssl genrsa -out server.key 2048 openssl req -new -out server.csr -key server.key
openssl x509 -req -in server.csr -CA ca.crt -CAkey ca.key -CAcreateserial -out server.crt -days 360
chmod 777 *
Note
Use the machine hostname of control plane as the common name.
Update
/etc/mosquitto/mosquitto.conf:# Place your local configuration in /etc/mosquitto/conf.d/ # # A full description of the configuration file is at # /usr/share/doc/mosquitto/examples/mosquitto.conf.example persistence true persistence_location /var/lib/mosquitto/ log_dest file /var/log/mosquitto/mosquitto.log include_dir /etc/mosquitto/conf.d listener 18883 allow_anonymous true cafile /etc/mosquitto/certs/ca.crt certfile /etc/mosquitto/certs/server.crt keyfile /etc/mosquitto/certs/server.key
Go to AMR_server_containers folder, and start the MQTT service:
cd <edge_insights_for_amr_path>/Edge_Insights_for_Autonomous_Mobile_Robots_*/AMR_server_containers
ansible-playbook 01_docker_sdk_env/docker_orchestration/ansible-playbooks/02_edge_server/smart_edge_open/fleetmanagement_interface.yaml
ufw allow 18883
For errors, go to Troubleshooting.
Open a browser, use the controller IP, and open <IP Address>:32764. Use the following credentials:
account:
tenant@thingsboard.orgpassword:
tenant
Go to the Rule Chain page, and select
MQTT_SEO.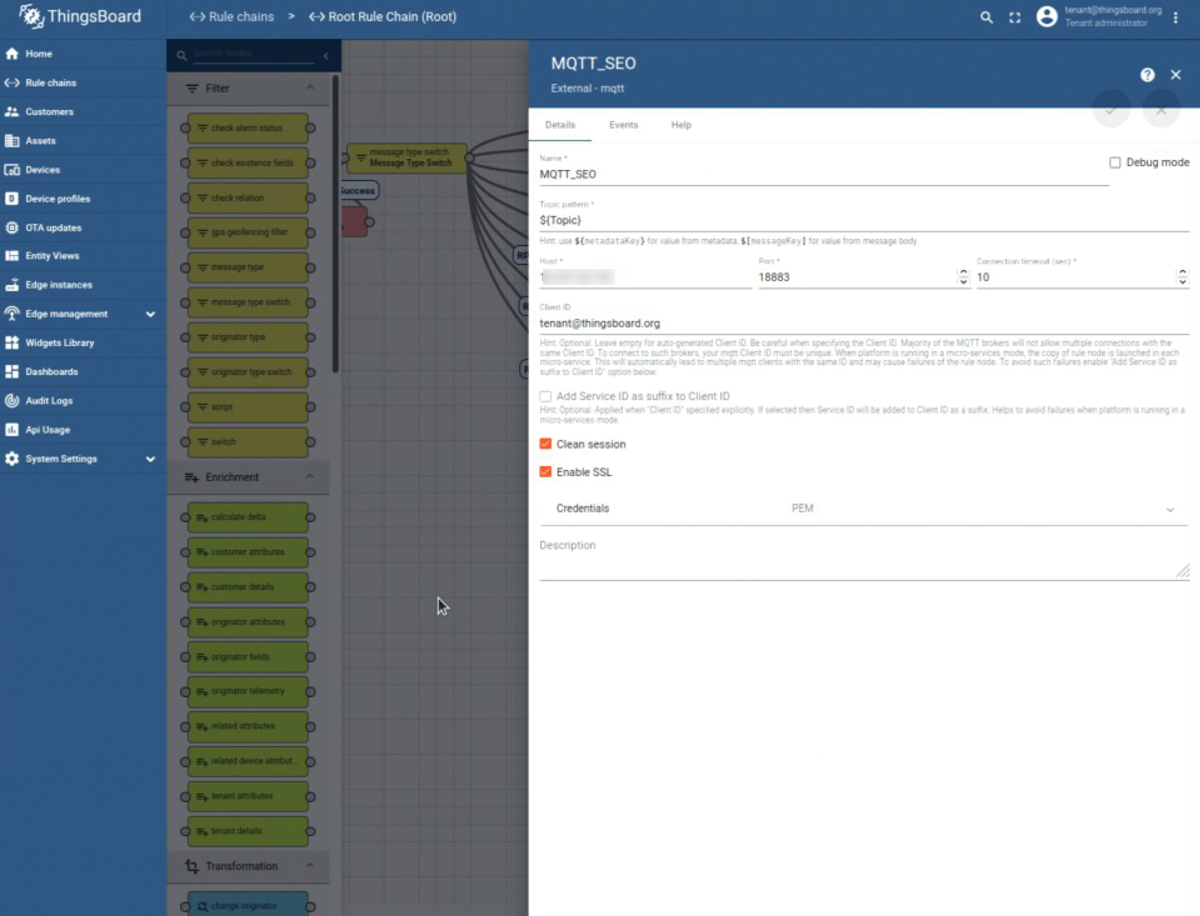
Assign the control plane IP to the variable
Host*.Select the
Enable SSLoption.Assign
PEMto the variableCredentials.Upload the
/etc/mosquitto/certs/server.crtcertificate that was generated above, and apply the changes.
Prepare ThingsBoard* for OTA Updates#
Prepare for the Intel® RealSense™ camera firmware update.
Download the latest firmware version from https://dev.intelrealsense.com/docs/firmware-releases.
Place the
.binfile that contains the firmware in a.tar.gzarchive. Make sure that you do not archive the entire directory, only the.binfile.Set up a basic HTTP server, and upload the
.tar.gzon it as a trusted repository server:Install the apache2:
sudo apt update
sudo apt install apache2
Put the
.binfile inside a.tar.gz, and place it on a http server:tar -czvf rs_firmware_update.tar.gz Signed_Image_UVC_<version>.bin sudo cp rs_firmware_update.tar.gz /var/www/html/
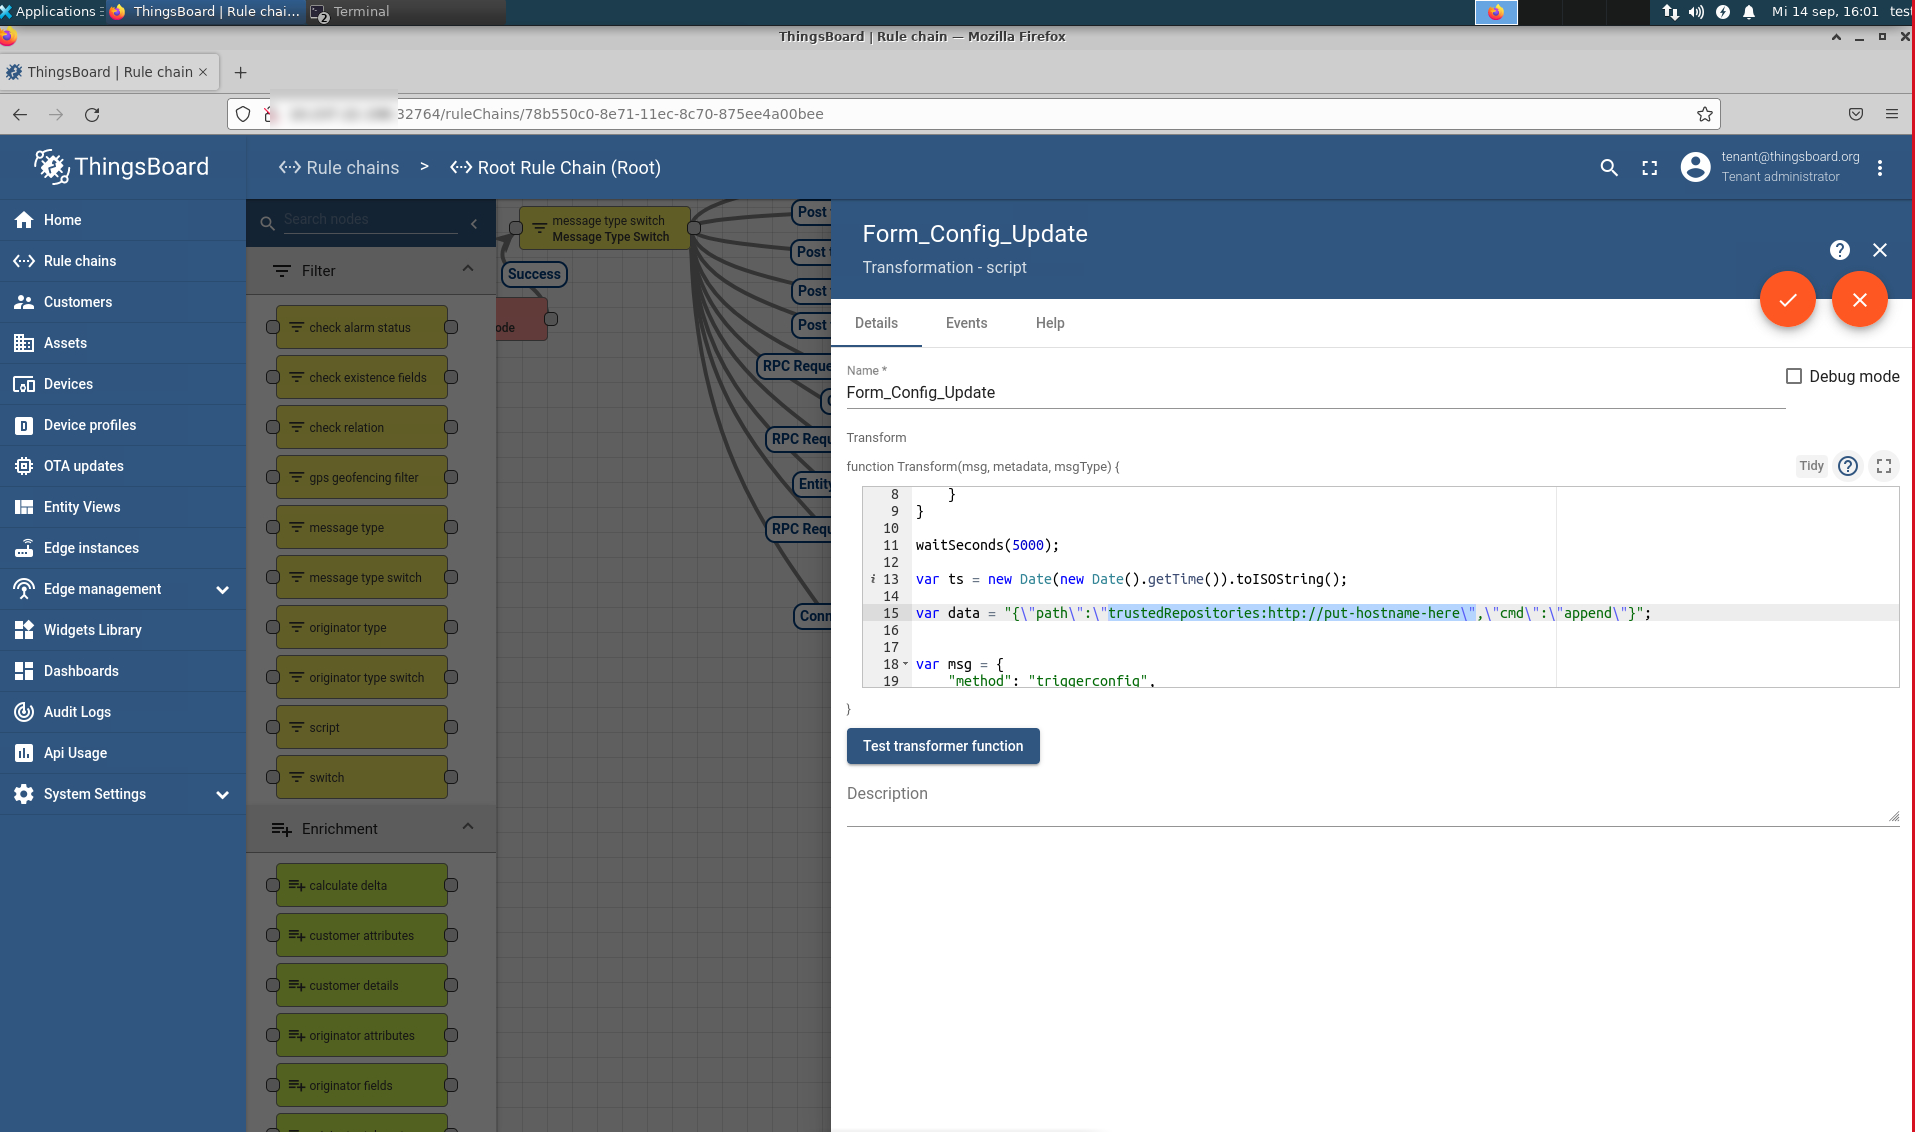
On ThingsBoard*, open Rule Chain.
Open Form_Config_Update, and, on line 15, update the URL of HTTP host that has the new firmware.
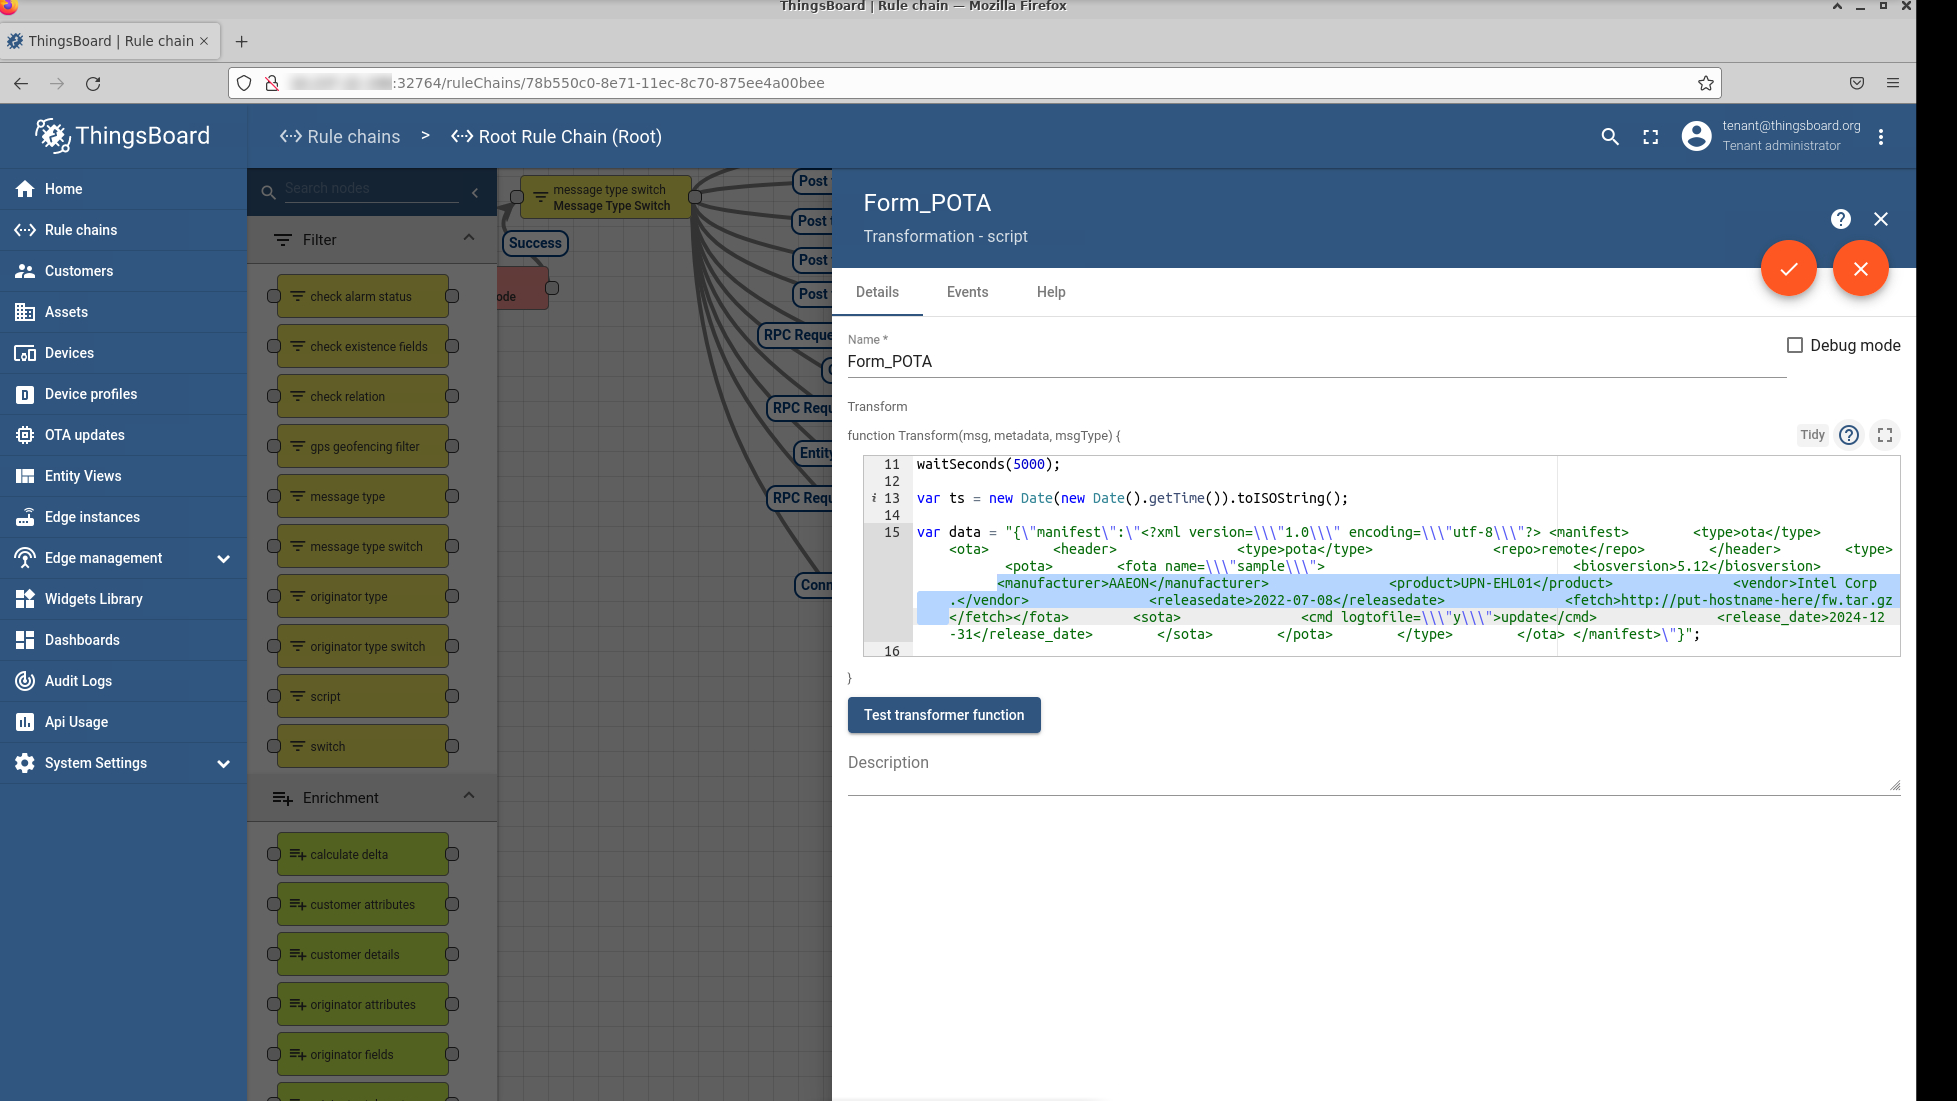
Open Form_POTA, and, on line 15, update the following.
The entire HTTP URL with the .tar.gz file for the firmware file.
Note
The link should be similar to
http://<hostname>/<archive.tar.gz>The Manufacturer, Vendor, and the Product name with the output of the following commands. Execute these commands on the robot.
dmidecode -t system  | grep Product
dmidecode -t system  | grep Manufacturer
dmidecode -t bios  | grep Vendor
Note
Updating the Manufacturer, Vendor, and Product name needs to be done every time you onboard a new type of robot. If these values do not match the ones from the robot trying to onboard, the flow fails.
Save all changes.
Troubleshooting#
If, even after reinstalling the playbook and verifying that the ports are not blocked by the firewall, ThingsBoard* does not work, contact Intel’s Support Forum.
Verify that the MQTT service is running:
systemctl status mosquitto.service
If the command above returns
Active: failed:chmod -R 755 /etc/mosquitto/ systemctl restart mosquitto.service systemctl status mosquitto.service systemctl restart mqtt_aota.service systemctl status mqtt_aota.service
Expected result: The status of the mosquitto service is
Active: active.